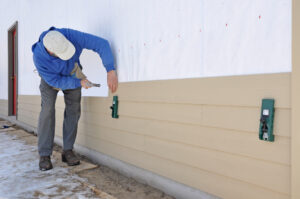

Siding trim refers to the pieces that finish the raw edges of your siding panels. Think of it like the frame around a picture. It creates clean lines and covers gaps where siding meets your roof, windows, doors, and corners. More importantly, it’s your home’s first line of defense against water infiltration.
When installed properly, siding trim forms a weatherproof barrier. But even small gaps or poor cuts can open the door to rot, mold, and costly repairs. That’s why understanding the basics of siding trim matters. It helps you recognize quality work and have informed conversations with your contractor.
The 3 Key Pieces of Siding Trim
Getting to know the main components of siding trim can feel a bit technical, but don’t worry. It’s simpler than it sounds. Here are the three key players and what a good installation should look like.
1. J-Channels: Framing Your Doors and Windows
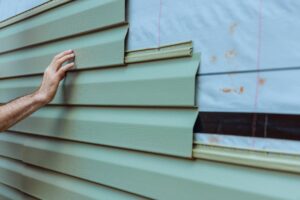
A J-channel is a piece of trim shaped like the letter “J” that holds siding panels in place around openings. You’ll find it framing every window and door, and along the eaves where your walls meet the roof. Its job is to hide the cut ends of the siding for a clean look while channeling water away.
A well-done installation should have clean, mitered corners where the J-channels meet, with the trim fitting snugly against the window or door frame. Any gaps, cracks, or uneven lines are a sign of trouble. Wavy or warped channels often mean the installer nailed them too tightly, while visible gaps can allow water to seep behind the siding and cause long-term damage.
Actual costs depend on your location, project scope, and materials. The best way to know what you'll pay is to get quotes from local contractors.
Get Your Free Estimate →2. Corner Posts: Protecting the Edges
Corner posts are vertical trim pieces installed on the inside and outside corners of your home. They cover the ends of the siding panels where two walls meet, providing a polished look and protecting these vulnerable areas from impact and weather.
Corner posts should be perfectly plumb (straight up and down) and securely fastened. They can either match your siding for a seamless look or use a contrasting color to create a stylish accent. Rippling or bulging corner posts are a major red flag. This often means the installer didn’t leave enough room for the siding to expand and contract, causing it to buckle under pressure.
3. Starter Strips: The Foundation for Your Siding
The starter strip is a long, thin piece of trim you’ll never see. It’s installed at the very bottom of the wall, just above the foundation. This piece is responsible for locking the first row of siding panels securely in place and ensuring the entire installation is level.
Although it’s hidden, you can spot the results of a good starter strip installation. Your siding rows will look perfectly straight and even all the way up the wall. If the siding rows look wavy or crooked, the starter strip was likely installed unevenly. This is more than a cosmetic issue, as it can cause the panels to sit improperly and lead to gaps.
"We matched with a great contractor the same day. The whole process was easy and completely free."
How Much Does Siding Trim Cost?
It’s difficult to separate the cost of trim from a total siding project because it’s an integral part of the installation. However, the amount of trim needed is a key factor that influences your final price. The average siding project costs between $5,400 and $16,000, and trim is a piece of that puzzle.
Here are the factors that will impact the trim portion of your budget:
- Home Architecture: A simple, rectangular home has four corners and minimal trim. A complex home with many windows, gables, and corners will require significantly more trim pieces and labor, increasing the overall cost.
- Material Choice: Vinyl trim is the most budget-friendly option. Fiber cement and wood composite trim are more expensive but offer different aesthetics and levels of durability.
- Labor Costs: Labor makes up a significant portion of a siding budget, often ranging from $2 to $5 per square foot. More intricate trim work requires more time and skill from the installers, which will be reflected in the labor costs.
Why You Should Hire a Pro for Siding Trim Installation
It can be tempting to consider installing siding yourself, but trim work is where expertise really matters. Improper installation is one of the main reasons siding fails, and small mistakes can lead to costly water damage that may not be covered by your homeowner’s insurance.
The Risks of a DIY Job
- Voided Warranties: Most siding manufacturers’ warranties are very specific. Common DIY mistakes like nailing panels too tightly or leaving improper gaps can instantly void your warranty, leaving you unprotected.
- Lack of Specialized Tools: Professionals use specialized tools like snap-lock punches and nail-hole slot punches to ensure siding can expand and contract properly. Without these tools, it’s very difficult to get a secure, weather-tight fit.
- Water Damage: The most significant risk is improper water management. Professionals are trained to install flashing and create seals around windows and doors that channel water out and away from your home. A single mistake here can lead to hidden leaks and rot.
Hiring a qualified professional ensures the job is done right, your warranty remains intact, and your home is protected.
Essential Maintenance and Care Tips for Siding Trim
Keeping your siding trim in good condition not only preserves your home’s appearance but also protects it against costly damage. Here are some simple but important practices to follow:
Clean Regularly
Give your siding and trim a thorough cleaning at least once a year. Use a soft brush or sponge with mild detergent and water, and avoid harsh chemicals or abrasive tools. For light mold or mildew, a water and white vinegar mix works well. Rinse thoroughly, and only use a pressure washer if your siding manufacturer specifically recommends it.
Why Hire a Licensed Professional
- Licensed & insured — protects you from liability
- Warranty coverage — manufacturers require pro installation
- Code compliance — avoids permit issues
- Faster completion — pros finish in days, not weeks
Inspect for Damage
Walk around your home a few times a year to check for cracks, rot, loose boards, peeling paint, or pest activity. Catching these issues early makes repairs much easier and less expensive.
Make Repairs Quickly
Fix loose panels, small chips, or cracks as soon as you see them. For wood trim, plan to repaint or restain every three to five years to keep moisture and sunlight from causing damage. Touch up paint as needed between full repaints.
DIY vs. Professional: At a Glance
Seal and Caulk Joints
Check the caulk around windows, doors, and trim joints. Replace any cracked or missing caulk to keep moisture out and improve energy efficiency. Seasonal changes often reveal gaps, so it’s worth checking after major weather shifts.
Control Vegetation
Trim back trees, shrubs, and plants so they don’t touch your siding or trim. This prevents scratches, rot from trapped moisture, and reduces the risk of pests.
Spring and summer are the busiest seasons for home improvement projects — top-rated contractors book up fast. Lock in your estimate now before demand peaks.
Check Availability in Your Area →Keep Gutters Clear
Clean gutters and downspouts so water flows away from the house instead of onto siding and trim. Consistent drainage is one of the best defenses against moisture damage.
Handle Mold and Stains Promptly
If you notice mold, mildew, or stains, treat them right away. A mix of water and vinegar works for light buildup, while wood siding may require a mild bleach solution or a cleaner recommended for your specific material.
Ready to Move Forward?
Tell us about your project and get matched with up to 3 pre-screened contractors. Compare quotes, check reviews, and hire with confidence.
Call a Professional When Needed
For major repairs, persistent mold problems, or material-specific issues you’re not comfortable handling, it’s best to bring in a siding professional.
Quick Maintenance Checklist
- Clean siding and trim once a year
- Inspect for cracks, pests, and damage
- Repair and touch up as needed
- Repaint or reseal wood every 3–5 years
- Check and replace caulk around joints
- Trim back nearby vegetation
- Keep gutters and downspouts clear
By staying on top of these steps, you’ll keep your siding trim looking fresh and extend its lifespan for years to come.
Conclusion
Siding trim may seem like a minor detail, but it’s the key to a professional-looking and durable siding job. J-channels, corner posts, and starter strips work together to protect your home from water, prevent panels from buckling, and provide a clean, finished look.
Because proper trim installation is so technical, it’s a job best left to the pros. By understanding what to look for and asking the right questions, you can feel confident in your hiring decision and enjoy a beautiful, low-maintenance exterior for years to come. If you’re ready to get started, you can find a local siding professional to help with your project.

Anna has over six years of experience in the home services and journalism industries and serves as the Content Manager at MyHomePros.com, specializing in making complex home improvement topics like HVAC, roofing, and plumbing accessible to all. With a bachelor’s degree in journalism from Auburn University, she excels in crafting localized, comprehensive guides that cater to homeowners’ unique needs. Living on both coasts of the United States has equipped her with a distinctive perspective, fueling her passion for turning any house into a cherished home through informed, personalized decision-making.
Connect with top-rated local contractors who can help you with siding, roofing, HVAC, windows, and more. Get free quotes from verified professionals in your area today.