
If you live in a home without access to a municipal sewer system, a septic tank isn’t just an option—it’s a necessity for managing your household’s wastewater. But here’s the catch: a poorly installed system can lead to messy backups, foul odors, and even costly repairs down the road.
A properly installed septic system keeps your home running smoothly while protecting your property and the environment. In this guide, we’ll walk you through every step of the process, from choosing the right system to understanding installation costs and ensuring long-term performance.
Table of Contents
What Is a Septic Tank?
Septic tanks are essential for managing wastewater in homes not connected to municipal sewer systems. These systems serve as holding chambers where solids and liquids are separated, treated, and safely dispersed into the surrounding soil, ensuring sanitation and environmental safety.
A septic tank is a watertight container typically constructed from concrete, fiberglass, or plastic. Its primary purpose is to hold wastewater from household plumbing systems. Inside the tank, solids settle at the bottom to form a layer of sludge, while lighter materials like oils and grease float to the surface, creating a scum layer. This separation process is crucial for preventing clogging and ensuring proper waste management.
Once the wastewater is separated, the liquid effluent flows from the tank into a drain field, also known as a leach field. Here, the effluent undergoes further natural filtration as it percolates through the soil. Anaerobic bacteria within the tank aid in breaking down organic matter, reducing the environmental impact and ensuring the safe return of treated water to the ecosystem.
Types of Septic Systems
Different septic systems are designed to accommodate various soil conditions, property layouts, and household needs.
1. Conventional Septic Systems
The most common type, conventional systems use a combination of a septic tank and a drain field to process wastewater. These are ideal for properties with well-draining soil.
2. Mound Systems
Mound systems are designed for areas with shallow soil, high groundwater, or bedrock near the surface. Wastewater is treated in a sand mound before dispersal, ensuring proper filtration.
3. Chamber Systems
Chamber systems use interconnected plastic chambers instead of gravel trenches, making them easier to install and maintain. They’re suitable for areas with irregular terrain or limited space.
4. Aerobic Treatment Units (ATUs)
ATUs introduce oxygen into the treatment process, making them more efficient at breaking down waste. They’re ideal for properties needing higher treatment levels or facing poor soil conditions.
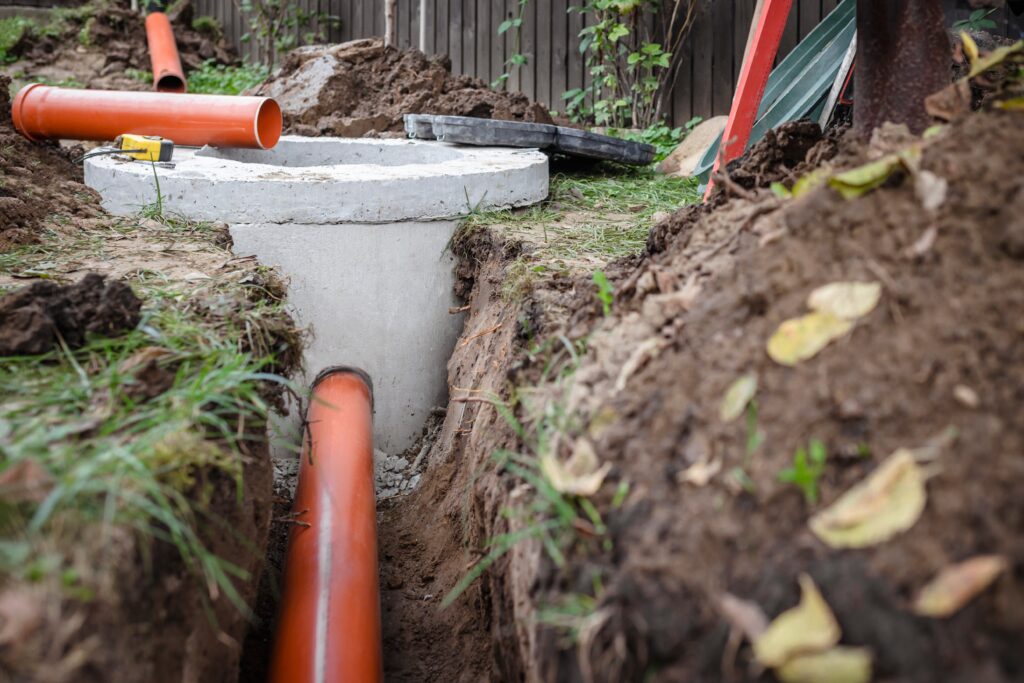
Steps to Install a Septic Tank
Installing a septic tank involves several phases, each requiring precision and compliance with local regulations.
Actual costs depend on your location, project scope, and materials. The best way to know what you'll pay is to get quotes from local contractors.
Get Your Free Estimate →1. Site Evaluation and Permits
A thorough site evaluation ensures the property is suitable for a septic system.
- Soil Testing: Conduct a percolation (perc) test to measure how quickly soil absorbs water.
- Regulatory Compliance: Secure permits from local health departments or environmental agencies to meet legal requirements.
2. Choosing the Right System
Selecting the appropriate system depends on:
- Household Size: Larger households require systems with higher capacity.
- Soil Conditions: Choose a design compatible with the property’s soil absorption rate.
- Budget: Balance cost-effectiveness with durability and efficiency.
3. Excavation and Preparation
Prepare the site by:
- Clearing the Area: Remove obstacles like rocks or tree roots.
- Excavating: Dig spaces for the tank and drain field, ensuring they meet size and depth requirements.
4. Installing the Tank and Drainage Field
- Tank Placement: Place the septic tank on a stable, level base to prevent shifting.
- Connecting Pipes: Install inlet and outlet pipes securely, ensuring proper slope for optimal flow.
- Drain Field Setup: Lay perforated pipes or chambers in gravel trenches to distribute effluent evenly.
"We matched with a great contractor the same day. The whole process was easy and completely free."
5. Backfilling and Testing
- System Testing: Inspect for leaks or misalignments before covering the system with soil.
- Backfilling: Compact soil over the tank and drain field to prevent settling.
Costs of Septic Tank Installation
Septic system installation costs vary depending on system type, property conditions, and local labor rates.
Average Costs
The national average ranges between $3,000 and $10,000, with high-end systems like ATUs costing upwards of $20,000.
Factors Influencing Costs
- Tank Size: Larger tanks require more material and labor.
- Soil Type: Challenging soil conditions may necessitate additional materials or specialized systems.
- Permits and Inspections: Fees vary by location.
Budgeting Tips
- Obtain multiple quotes from licensed contractors.
- Consider alternative systems like chamber designs to save on material costs.
- Plan for future maintenance expenses when budgeting.
How Long Does It Take to Install a Septic Tank?
The timeline for installing a septic system varies based on factors like system complexity, permitting, and site conditions. Typically, the process takes 2 to 3 weeks. Here’s a breakdown of the timeline:
Site Evaluation and Permits (1–2 Weeks)
The first phase of installing a septic system involves site evaluation and securing permits. This step typically takes one to two weeks and is often the most time-intensive part of the process. Soil tests, such as a percolation test, are conducted to determine the soil’s ability to absorb wastewater. These results are critical for selecting the right type of system. Additionally, permits must be obtained from local health departments or environmental agencies, which may require on-site inspections and approval before any work can begin.
Excavation and Installation (2–5 Days)
Once the necessary permits are in place, the next step is excavation and installation. This phase usually takes two to five days, depending on the site’s conditions and system complexity. Contractors clear the area, dig trenches, and prepare spaces for the septic tank and drain field. The septic tank is then placed, and the system components, such as pipes and drain field chambers, are installed. Favorable weather and well-prepared soil can expedite this stage significantly.
Backfilling and Final Inspections (1–3 Days)
The final phase includes backfilling the system and conducting inspections. This process typically takes one to three days. After installation, the system is tested for leaks and proper alignment to ensure it meets regulatory standards. Once approved, the trenches and tank are backfilled with soil, and the area is compacted and leveled. A final inspection by local authorities may be required to confirm the system’s compliance with all regulations.
Potential Delays
While the timeline for septic system installation is generally predictable, delays can occur. Weather conditions, unexpected soil issues, or scheduling conflicts with contractors and inspectors may extend the process. Proper planning and clear communication with professionals can help reduce these risks and ensure a smoother installation process.
Benefits of Professional Septic Tank Installation
Installing a septic tank is a significant undertaking that requires precision, expertise, and a thorough understanding of local regulations. While DIY installation may seem tempting to save costs upfront, the complexities of the process can lead to costly mistakes. Hiring professionals ensures your septic system is reliable, long-lasting, and compliant with all requirements. Here’s why professional septic tank installation is the smarter choice.
Why Hire a Licensed Professional
- Licensed & insured — protects you from liability
- Warranty coverage — manufacturers require pro installation
- Code compliance — avoids permit issues
- Faster completion — pros finish in days, not weeks
1. Expertise and Compliance
Professional septic tank installers bring the experience and knowledge needed to navigate complex installation requirements. Septic systems must adhere to local building codes and environmental regulations, which vary depending on location. Professionals are familiar with these guidelines, ensuring your system meets the necessary standards for proper permitting and inspections.
- Permitting: Licensed installers handle the permitting process, submitting plans and paperwork required by local health and building departments. This ensures your system is legally approved before installation begins.
- Site Assessment: Professionals perform thorough site evaluations, testing soil conditions, determining water table levels, and choosing the optimal location for the septic tank and drain field.
- Environmental Protection: Incorrect installations can contaminate groundwater, nearby streams, or wells, creating environmental hazards. Professionals design systems that safely treat and disperse wastewater, minimizing risks of pollution.
By hiring experts, you eliminate the guesswork and avoid delays or fines associated with failed inspections or non-compliance.
2. Proper Equipment and Techniques
Septic tank installation requires specialized tools, heavy machinery, and precise techniques that most homeowners don’t have access to. Professionals bring the right equipment and skills to ensure every component is installed correctly, reducing the risk of common issues that occur with DIY attempts.
- Precision Alignment: Proper placement of pipes, tanks, and drain fields is critical. Professionals ensure all components are aligned with accurate slopes to allow smooth, unobstructed wastewater flow. Improper slopes can lead to blockages, backups, or stagnant water.
- Heavy Machinery: Excavating the ground for septic tanks and drain fields requires equipment like backhoes and compactors. Professionals can safely and efficiently dig trenches and level the ground, avoiding damage to existing utilities or landscaping.
- Material Selection: Licensed installers know which tank types (e.g., concrete, fiberglass, or polyethylene) work best for your property, factoring in soil composition, climate, and household usage.
Using professional tools and methods ensures the system is installed to last, avoiding costly errors that could compromise its performance.
3. Long-Term Savings
Septic tank installation requires specialized tools, heavy machinery, and precise techniques that most homeowners don’t have access to. Professionals bring the right equipment and skills to ensure every component is installed correctly, reducing the risk of common issues that occur with DIY attempts.
- Precision Alignment: Proper placement of pipes, tanks, and drain fields is critical. Professionals ensure all components are aligned with accurate slopes to allow smooth, unobstructed wastewater flow. Improper slopes can lead to blockages, backups, or stagnant water.
- Heavy Machinery: Excavating the ground for septic tanks and drain fields requires equipment like backhoes and compactors. Professionals can safely and efficiently dig trenches and level the ground, avoiding damage to existing utilities or landscaping.
- Material Selection: Licensed installers know which tank types (e.g., concrete, fiberglass, or polyethylene) work best for your property, factoring in soil composition, climate, and household usage.
Using professional tools and methods ensures the system is installed to last, avoiding costly errors that could compromise its performance.
Maintenance Tips for Your Septic System
Proper maintenance extends the life of your septic system and prevents breakdowns.
1. Regular Inspections
Have a professional inspect the system every 1–3 years to check for issues like leaks, tank overfilling, or clogged pipes.
DIY vs. Professional: At a Glance
2. Pumping Schedule
Schedule pumping every 3–5 years depending on tank size and household usage. Overfilled tanks can lead to backups and drain field damage.
3. What Not to Flush or Drain
Avoid flushing:
- Non-biodegradable items (e.g., wipes, feminine products).
- Grease or cooking oil.
- Harsh chemicals that can kill beneficial bacteria.
4. Protecting the Drain Field
- Avoid Compaction: Keep heavy vehicles and machinery off the drain field.
- Monitor Landscaping: Plant grass or shallow-rooted vegetation, but avoid trees with invasive roots.
What Happens If a Septic System Fails?
Common warning signs of septic system failure include slow drains, standing water near the drain field, or gurgling sounds in your plumbing. If you notice any of these issues, contact a licensed professional immediately to diagnose and address the problem before it worsens. Proper and timely action can save both money and the inconvenience of a total system failure.
A failing septic system can lead to a range of serious and costly problems, impacting both your home and the surrounding environment. Understanding the risks and recognizing early warning signs can help mitigate damage.
Spring and summer are the busiest seasons for home improvement projects — top-rated contractors book up fast. Lock in your estimate now before demand peaks.
Check Availability in Your Area →Backups and Overflow
One of the most noticeable issues with a failing system is wastewater backing up into your home or overflowing onto your property. This can create unsanitary conditions, health hazards, and potential structural damage to your home.
Environmental Contamination
When a system fails, untreated effluent may seep into the groundwater or nearby water bodies. This can lead to contamination of drinking water sources and harm local ecosystems, posing significant environmental and public health risks.
Foul Odors
A malfunctioning septic system often emits unpleasant odors, particularly near the tank or drain field. Persistent sewage smells are a clear indicator that the system isn’t functioning properly and requires immediate attention.
Expensive Repairs or Replacement
Repairing a failed septic system is usually much more expensive than maintaining it. In some cases, complete system replacement may be necessary, which can cost thousands of dollars and require extensive site work.
FAQs
Ready to Move Forward?
Tell us about your project and get matched with up to 3 pre-screened contractors. Compare quotes, check reviews, and hire with confidence.
Can I install a septic system on my own?
In some jurisdictions, homeowners are allowed to install their own septic systems, but this is generally not recommended unless they have significant professional experience. The risks and challenges often outweigh the potential cost savings.
Complexity and Precision
Installing a septic system requires meticulous calculations for tank placement, pipe slopes, and drain field design. Even minor errors can disrupt the system’s functionality, causing backups or environmental contamination.
Permits and Regulations
Most local governments require septic systems to be installed by licensed professionals to ensure compliance with health and environmental regulations. DIY installations can risk non-compliance, leading to fines or mandated corrections.
Specialized Equipment
Septic system installation often involves heavy machinery and specialized tools for excavation and alignment. Renting or purchasing this equipment can be costly and impractical for a one-time project.
Long-Term Risks
A poorly installed septic system is more likely to fail prematurely, resulting in expensive repairs or even full system replacement. The environmental risks, such as groundwater contamination, further emphasize the importance of professional installation.
While DIY installation might seem appealing for cost savings, the risks of errors and potential long-term expenses make hiring licensed professionals the safer and more reliable option.
What Factors Affect the Lifespan of a Septic System?
A well-maintained septic system can last anywhere from 20 to 40 years, but its longevity depends on several key factors. By understanding and addressing these elements, homeowners can ensure their system functions effectively for decades.
Material Quality
The type of materials used in the septic system significantly impacts its lifespan. Concrete tanks tend to last longer due to their durability, while plastic or fiberglass tanks are more susceptible to damage from shifting soil or heavy loads.
System Usage
Excessive water usage or flushing non-biodegradable materials can strain the system, leading to premature wear. Overloading the system with waste can also clog pipes and damage the drain field, shortening the system’s overall lifespan.
Soil and Environmental Conditions
The soil type and environmental factors around the installation site play a major role. Septic systems perform better in well-draining soil with low groundwater levels. High water tables or compacted soil can lead to inadequate filtration and potential system failure.
Regular Maintenance
Routine maintenance, including periodic inspections and pumping every 3–5 years, is essential. Regular upkeep prevents sludge from building up in the tank and reaching the drain field, which can cause clogs and backups.
Installation Quality
Professional installation is critical for ensuring proper alignment, slope, and secure connections between system components. Poorly installed systems are prone to leaks, backups, and early failures, making professional expertise a worthwhile investment.
By adhering to best practices for maintenance and addressing minor issues promptly, homeowners can maximize the lifespan of their septic system, ensuring it remains reliable for years to come.
What are the best septic systems for small properties?
For properties with limited space, choosing a septic system that is compact and efficient is essential. Several options are particularly well-suited for small or constrained areas:
Chamber Systems
Chamber systems replace traditional gravel trenches with a series of interconnected plastic chambers. These systems are compact, easy to install, and adaptable to a variety of terrains, making them an excellent choice for properties with limited space.
Aerobic Treatment Units (ATUs)
ATUs use oxygen to accelerate the breakdown of organic material, providing highly efficient wastewater treatment. They work well in confined spaces but require a consistent power supply and regular maintenance, making them slightly more demanding than other options.
Drip Irrigation Systems
Drip irrigation systems disperse treated wastewater through small pipes installed just below the soil surface. These systems are ideal for constrained spaces with poor soil conditions and are designed to use space efficiently while ensuring effective wastewater dispersal.
Mound Systems
Mound systems stack treatment layers vertically, making them suitable for properties with high groundwater levels or rocky soil. While they occupy more visual space, their design can be adjusted to accommodate smaller property footprints.
To choose the best system for your property, consult with a licensed professional who can assess your soil conditions, water table, and space limitations to recommend the most effective solution.
Conclusion
The right septic system, installed with precision, not only ensures reliable wastewater management but also protects your home and surrounding ecosystem. By exploring the different system types, understanding the installation process, and committing to regular maintenance, you can make confident, informed decisions. Working with licensed professionals ensures your septic system is installed to the highest standards, delivering dependable performance and peace of mind for years to come.
Sources
Additional Home Improvement Resources
- How Much Does Christmas Lighting Installation Cost?
- New Year’s Resolutions for Your Home
- Tips and Tricks for Decluttering

Anna has over six years of experience in the home services and journalism industries and serves as the Content Manager at MyHomePros.com, specializing in making complex home improvement topics like HVAC, roofing, and plumbing accessible to all. With a bachelor’s degree in journalism from Auburn University, she excels in crafting localized, comprehensive guides that cater to homeowners’ unique needs. Living on both coasts of the United States has equipped her with a distinctive perspective, fueling her passion for turning any house into a cherished home through informed, personalized decision-making.
Connect with top-rated local contractors who can help you with siding, roofing, HVAC, windows, and more. Get free quotes from verified professionals in your area today.