Guide to Building an Outdoor Kitchen
Picture this: You’re flipping burgers, sipping a cold drink, and hanging out with friends—all without running in and out of the house. That’s the beauty of an outdoor kitchen! It’s not just a fun upgrade; it makes cooking and entertaining easier while adding serious value to your home.
But before you start picking out the perfect grill or countertops, there are a few things to think about. Where should it go? How much should you budget? What materials will hold up best outside? A little planning now will save you time, money, and headaches later. Let’s dive into everything you need to know to build the ultimate outdoor kitchen!
Table of Contents
Planning Your Outdoor Kitchen
A little planning ahead can help you avoid costly mistakes and ensure your outdoor space is both functional and enjoyable. Here’s what to consider:
Choosing the Right Location
The location of your outdoor kitchen can make or break your experience. You’ll want to find a spot that’s both convenient and practical. Here are some factors to keep in mind:
- Proximity to Your House: A kitchen closer to your home makes it easier to bring food, drinks, and supplies in and out. It also means easier access to existing utilities like gas, water, and electricity.
- Yard Space: Consider how much room you have and how an outdoor kitchen will fit into your overall backyard layout. You’ll want enough space for cooking, dining, and socializing without things feeling cramped.
- Shade & Weather Protection: Cooking in the blazing sun or getting caught in the rain isn’t fun. If your chosen location doesn’t have natural shade, think about adding a pergola, awning, or even a large umbrella.
- Wind Direction: Pay attention to how the wind moves through your yard. You don’t want smoke from the grill blowing directly onto your guests or into your house. Position your cooking area so that smoke is carried away from your dining and lounging spaces.
Setting a Budget
Outdoor kitchens can range from a simple grill station to a fully equipped backyard cooking space with all the bells and whistles. Your budget will depend on several factors, including:
- Appliances: Basic grills start around $200, while high-end built-ins can cost $5,000 or more.
- Countertops & Cabinets: Weather-resistant materials like stone or stainless steel can drive up costs but last longer.
- Flooring & Shelter: If you’re adding a patio, pergola, or roof, factor in those costs.
- Utilities: Running gas, electricity, and water to your outdoor kitchen can significantly impact your budget, depending on how far your setup is from existing connections.
- Labor Costs: If you’re hiring a contractor, installation fees can add up quickly.
Setting a budget ahead of time helps you decide where to splurge and where to save. If you’re working with a limited budget, consider starting small and expanding later!
Determining Kitchen Size & Layout
Your kitchen’s size and layout should fit your space, cooking style, and entertaining needs. Here are some popular layout options:
- Straight-Line Kitchen: A simple, space-saving option that’s great for smaller yards or patios.
- L-Shaped Kitchen: Offers more counter space and separates the cooking area from the prep and serving zones.
- U-Shaped Kitchen: Provides plenty of cooking and prep space but requires more room.
- Island Style: Ideal for entertaining, with a central cooking station and seating around it.
Think about how you plan to use your outdoor kitchen. Do you want a cozy setup for family barbecues or a full-on chef’s station for big gatherings? Your layout should match your needs.
Checking Local Building Codes & Permits
Before breaking ground, check with your local municipality about building codes, zoning laws, and permits. Some areas have regulations about outdoor plumbing, electrical work, and permanent structures. You may also need approval for gas line installations or covered structures like pergolas and pavilions.
Skipping this step could lead to costly fines or the need to redo parts of your kitchen, so it’s best to get the green light before you start!
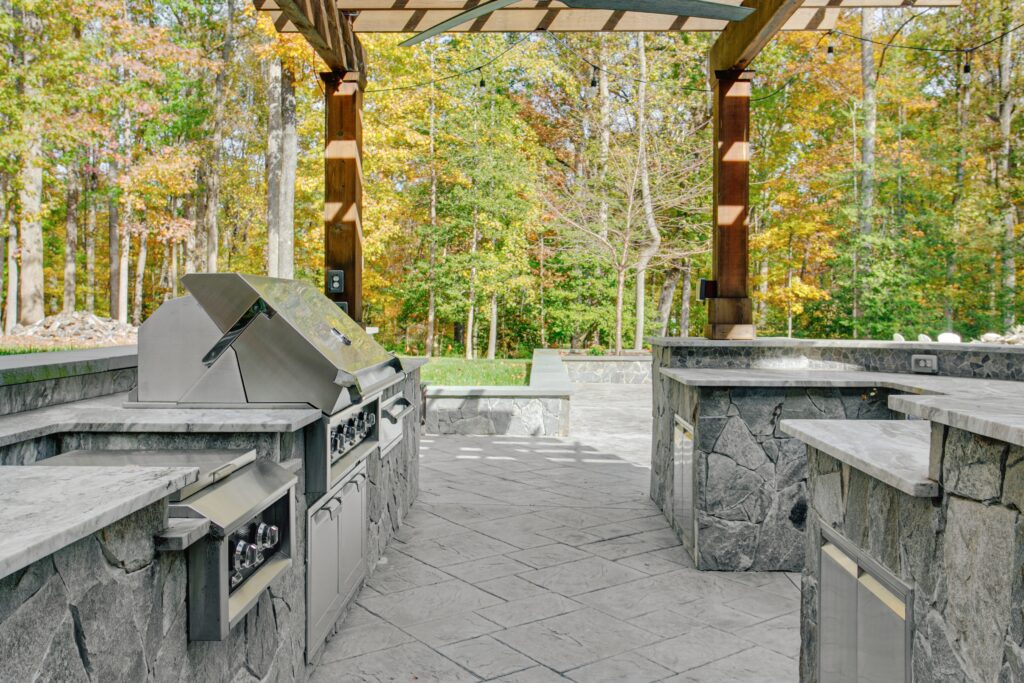
Choosing Materials and Appliances
Once you’ve nailed down your outdoor kitchen’s location and layout, it’s time to focus on the materials and appliances that will bring your vision to life. Since your kitchen will be exposed to the elements, choosing durable, weather-resistant materials is key to keeping it looking great and functioning well.
And when it comes to appliances, selecting the right grill and add-ons will make cooking outside more enjoyable and convenient. Here’s what to keep in mind:
Weather-Resistant Materials for Countertops, Flooring, and Cabinets
Your outdoor kitchen will need to withstand sun, rain, wind, and possibly snow, so it’s important to pick materials that are built to last.
- Countertops: Granite, concrete, and stainless steel are top choices for outdoor countertops because they’re durable, easy to clean, and resistant to heat and moisture. Avoid materials like laminate or wood, which can warp or crack over time.
- Flooring: If your outdoor kitchen is on a patio or deck, make sure the flooring is non-slip and weather-resistant. Popular options include stamped concrete, natural stone, outdoor-rated tiles, or composite decking. Avoid polished surfaces that can become slippery when wet.
- Cabinets: Outdoor cabinets need to handle exposure to sun and moisture. Stainless steel is rust-resistant and modern-looking, while marine-grade polymer and teak are great for a natural, weatherproof finish.
Selecting the Right Grill and Cooking Appliances
The grill is the heart of any outdoor kitchen, so choosing the right one is a big decision. There are a few types to consider:
- Gas Grills: Quick and convenient, gas grills heat up fast and are easy to control. They can be connected to a propane tank or a natural gas line for a continuous fuel source.
- Charcoal Grills: If you love that smoky, grilled flavor, charcoal is the way to go. It takes a little longer to heat up, but many grill enthusiasts swear by it.
- Pellet Grills: These use wood pellets for precise temperature control and rich, smoky flavor. They’re a great option if you love slow-cooked BBQ.
- Side Burners: Want to boil water, sauté veggies, or heat up sauces while you grill? Adding a side burner gives you extra versatility.
Additional Features
While a grill is essential, there are plenty of extras that can take your outdoor kitchen to the next level. Here are some worth considering:
- Sink & Prep Station: A sink makes food prep and cleanup easier. If running plumbing outdoors isn’t an option, consider a portable outdoor sink that hooks up to a garden hose.
- Outdoor Refrigerator: Keep drinks, condiments, and perishable foods chilled and ready to go with a small outdoor-rated fridge.
- Pizza Oven: A built-in or freestanding pizza oven lets you bake wood-fired pizzas right in your backyard.
- Storage Cabinets & Drawers: Keep grilling tools, spices, and utensils organized with weatherproof storage.
- Warming Drawers: If you’re cooking for a crowd, a warming drawer keeps food hot until it’s time to serve.
Energy Efficiency & Fuel Considerations
Since your outdoor kitchen will be using gas, electricity, or both, it’s worth thinking about energy efficiency to keep costs down.
- If you’re using a gas grill, consider hooking it up to a natural gas line instead of using propane tanks—it’s more cost-effective and convenient in the long run.
- Opt for energy-efficient appliances to reduce power consumption, especially for outdoor refrigerators and lighting.
- Solar-powered lights and LED fixtures are great options for cutting down on electricity use while keeping your kitchen well-lit.
Designing for Functionality and Comfort
A well-designed outdoor kitchen isn’t just about having the right appliances—it should also be a space that’s comfortable, functional, and inviting.
Whether you’re grilling up a family dinner or hosting a summer party, the right setup can make your outdoor kitchen the heart of your backyard. Here’s how to create a space that works for cooking, dining, and relaxing.
Creating Designated Zones
Just like an indoor kitchen, your outdoor setup should be organized into functional zones to make cooking and entertaining easy.
- Prep Zone: This is where you’ll chop, marinate, and get everything ready before it hits the grill. A good prep area should have plenty of counter space and easy access to utensils, seasonings, and trash bins.
- Cooking Zone: The star of the show! This is where your grill, side burners, pizza oven, and any other cooking appliances will be. Make sure it’s ventilated properly and positioned so that smoke doesn’t blow into seating areas.
- Dining Zone: Whether it’s a full outdoor dining table or a casual bar area, this space should be set up for easy serving and comfort. Consider placing it near the prep zone for quick access to food.
- Entertainment Zone: If you want your outdoor kitchen to be a gathering hub, add lounge seating, a fire pit, or even an outdoor TV or speaker system to create a space where people want to hang out.
Seating and Dining Options
The right seating can turn your outdoor kitchen into a true entertaining space where people feel comfortable lingering over food and drinks. Consider these options:
- Bar Seating: If your kitchen has a built-in island or counter, add barstools for a casual, space-saving seating option.
- Dining Table & Chairs: A classic setup for sit-down meals with family and friends. Choose weather-resistant materials like teak, powder-coated metal, or outdoor wicker.
- Built-In Benches: Great for saving space and adding extra seating, built-in benches can double as storage when designed with lift-up seats.
- Cozy Lounge Area: If you have the space, a small outdoor sofa or Adirondack chairs create a relaxing vibe where guests can chat and enjoy drinks.
Shade and Weather Protection
Nobody wants to cook or eat under the blazing sun or get rained out in the middle of dinner. Adding shade and weather protection keeps your outdoor kitchen comfortable no matter the season.
- Pergolas & Gazebos: These provide a stylish, semi-covered structure that offers shade while still letting in airflow and natural light. You can even add hanging plants, fans, or string lights for extra ambiance.
- Retractable Awnings: A great adjustable option that lets you choose between sun or shade.
- Oversized Umbrellas: Ideal for flexible, budget-friendly shade that can be moved around as needed.
- Patio Covers & Roof Extensions: If you’re looking for year-round protection, extending your home’s roof or adding a solid patio cover can keep your outdoor kitchen usable even in rainy or colder months.
Proper Lighting for Nighttime Use
Good lighting isn’t just about aesthetics—it’s also important for safety and visibility when cooking at night.
- Task Lighting: Focused lighting over the grill, prep areas, and dining table so you can see what you’re doing when the sun goes down. LED spotlights or under-cabinet lighting work great.
- Accent Lighting: Soft lighting around seating areas, pathways, and countertops creates a warm, inviting atmosphere. Think of wall sconces, lanterns, or deck lighting.
- String Lights & Edison Bulbs: These add a cozy, festive touch and are an easy way to enhance the mood of your outdoor space.
- Solar or LED Path Lights: If you have a walkway leading to your outdoor kitchen, small solar lights help illuminate the path for guests while adding a stylish touch.
Essential Utilities and Safety Considerations
An outdoor kitchen isn’t just about having a grill and some counter space—it also needs the right utilities to function smoothly and safely. From running water for a sink to making sure your grill has proper ventilation, taking care of these details before you start building is key.
Here’s what to keep in mind when setting up plumbing, electricity, gas, and fire safety features.
Plumbing for Sinks and Ice Makers
Having a sink in your outdoor kitchen makes meal prep and cleanup much easier. You won’t have to run back inside every time you need to rinse vegetables or wash your hands. If you plan to install a sink, consider the following:
- Cold Water vs. Hot & Cold Water: A simple cold-water connection is the easiest option, but if you want warm water for dishwashing, you may need to run a hot water line or install an outdoor water heater.
- Drainage Options: Depending on your setup, you may need a direct drain connection to your home’s plumbing or a dry well system that filters wastewater into the ground.
- Ice Makers & Beverage Stations: If you love hosting, an outdoor ice maker or mini beverage fridge can be a great addition. These will also need a water hookup to function.
Electrical Setup for Appliances, Outlets, and Lighting
Most outdoor kitchens require some level of electrical work—whether it’s for powering a refrigerator, lighting up the cooking area, or even plugging in a blender for frozen drinks.
Here’s what you need to consider:
- Outdoor-Rated Outlets: Standard indoor outlets won’t cut it outdoors. You’ll need GFCI (Ground Fault Circuit Interrupter) outlets, which automatically shut off if moisture is detected, keeping you safe from electrical shocks.
- Lighting: If you plan to use your kitchen at night, you’ll need proper task lighting for cooking and softer ambient lighting for dining areas. LED lights are energy-efficient and last longer outdoors.
- Power for Appliances: Refrigerators, wine coolers, warming drawers, and other electric appliances need dedicated circuits to prevent power overloads. Make sure you discuss this with an electrician before installation.
Gas Line Installation for Built-In Grills and Stoves
If you’re installing a built-in gas grill, stove, or side burner, you’ll need a reliable fuel source. You have two main options:
- Propane Tanks: The easiest and most flexible option—just swap out the tank when it’s empty. However, running out of propane in the middle of cooking can be frustrating!
- Natural Gas Line: A permanent gas hookup is more convenient and cost-effective in the long run since you’ll never run out of fuel. However, it requires professional installation and may need permits from your local utility company.
Before installing a gas line, consult with a licensed contractor or plumber to ensure it meets safety regulations. Also, place the grill in an area with proper ventilation so gas fumes don’t build up.
Fire Safety Tips and Ventilation Considerations
Since outdoor kitchens involve open flames, hot surfaces, and gas connections, fire safety should be a top priority. Here’s how to keep your outdoor cooking space safe:
- Keep the Grill Away from Flammable Materials: Place the grill at least 10 feet from your house, wooden structures, or overhanging trees.
- Install a Vent Hood for Covered Kitchens: If your grill is under a pergola, roof, or enclosed space, you’ll need a vent hood to remove smoke and prevent carbon monoxide buildup.
- Use Non-Flammable Materials for Surroundings: Brick, stone, and stainless steel are the best choices for the cooking area. Avoid wood or other materials that can easily catch fire.
- Check Gas Connections Regularly: Leaky gas lines can be dangerous. If you ever smell gas, shut off the supply immediately and call a professional.
Maintenance and Long-Term Care
Once you’ve built your outdoor kitchen, you’ll want to keep it looking great and working properly. Since it’s exposed to the elements, regular maintenance is key to preventing wear and tear, keeping appliances in top shape, and avoiding costly repairs down the road.
Here’s how to protect your investment and keep your outdoor kitchen in pristine condition year-round.
Protecting Appliances and Surfaces from Weather Damage
Outdoor kitchens face sun, rain, wind, and even snow, so choosing weather-resistant materials is just the first step—proper care and protection are just as important.
- Stainless Steel Appliances: Wipe them down regularly to prevent rust and stains. Use a stainless steel cleaner to keep them shiny and corrosion-free.
- Countertops: Seal stone countertops (like granite or concrete) every 1-2 years to prevent moisture damage and stains. Avoid placing hot pots directly on the surface to prevent cracking.
- Cabinets and Storage: If you have wooden cabinets, apply a weatherproof sealant to prevent warping. Stainless steel and polymer cabinets should be cleaned and dried regularly to avoid mold buildup.
- Grill Maintenance: Clean the grates after each use, check burners for clogs, and empty the grease tray to prevent fires.
Covering and Storing Equipment During Off-Seasons
If you live in an area with harsh winters or heavy rain, covering and storing your equipment properly is the best way to extend its lifespan.
- Invest in High-Quality Covers: Use weatherproof, UV-resistant covers for your grill, refrigerator, sink, and countertops to prevent damage from rain, snow, and sun exposure.
- Store Small Appliances Indoors: If possible, bring in small appliances like blenders, portable burners, and pizza ovens when not in use for long periods.
- Protect Furniture & Cushions: Store cushions and fabric seating in a dry place, or use storage benches to keep them safe from moisture and mold.
- Winterize Plumbing: If your outdoor kitchen has a sink or ice maker, turn off the water supply and drain all pipes before freezing temperatures hit to avoid burst pipes.
With a little regular maintenance and seasonal care, your outdoor kitchen will stay in great shape for years, giving you countless opportunities to cook, entertain, and enjoy your outdoor space.
Conclusion
Building an outdoor kitchen is an exciting investment that can completely transform your backyard. Whether you’re dreaming of a simple grilling station or a fully equipped outdoor cooking space, the key is to plan carefully, choose durable materials, and design a layout that works for your lifestyle.
The best part? It’s your space, so customize it to fit your needs! Your outdoor kitchen should make cooking and entertaining more fun and effortless—not feel like a hassle.
Additional Kitchen Resources

Anna has over six years of experience in the home services and journalism industries and serves as the Content Manager at MyHomePros.com, specializing in making complex home improvement topics like HVAC, roofing, and plumbing accessible to all. With a bachelor’s degree in journalism from Auburn University, she excels in crafting localized, comprehensive guides that cater to homeowners’ unique needs. Living on both coasts of the United States has equipped her with a distinctive perspective, fueling her passion for turning any house into a cherished home through informed, personalized decision-making.
Connect with top-rated local contractors who can help you with siding, roofing, HVAC, windows, and more. Get free quotes from verified professionals in your area today.