A siding system is more than just the panels you see on the outside of a house. It acts as a protective layer that guards against weather, moisture, and energy loss while shaping the overall look of your home.
Each part of the system has a role. Some direct water away, others seal edges or add strength, and together they form a durable barrier. Learning how these pieces work helps you spot problems early, communicate clearly with contractors, and take better care of your home’s exterior.
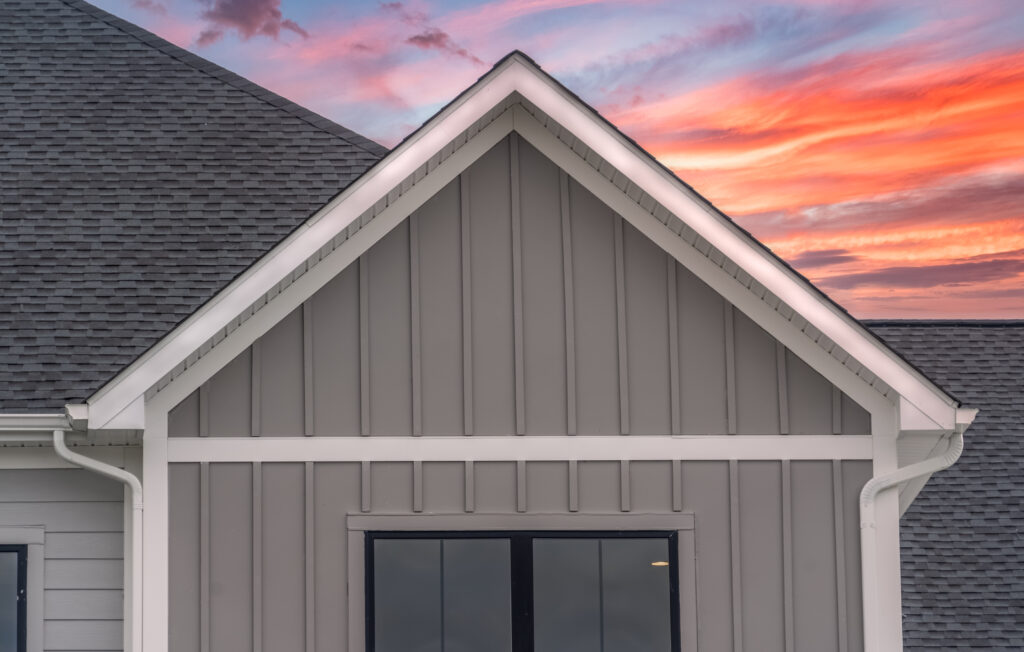
Main Structural Components
These core layers form the foundation of your home’s weather protection system, working together to manage moisture and provide structural support.
| Component | Function | Visibility | Typical Materials |
| Siding Panels | Primary weather barrier and aesthetic layer | Fully visible | Vinyl, wood, fiber cement, metal |
| House Wrap | Moisture barrier behind panels | Hidden | Tyvek, felt paper, synthetic membranes |
| Sheathing | Structural backing for attachment | Hidden | Plywood, OSB |
| Insulation | Thermal performance enhancement | Hidden | Rigid foam boards, reflective barriers |
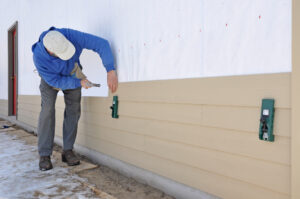
Siding Panels
The most visible component that gives your home its color and texture. Available in materials including vinyl, wood, fiber cement, and metal, these panels serve as the primary barrier against rain, wind, and snow.
House Wrap (Underlayment)
A weather-resistant membrane installed behind the siding panels that stops liquid water penetration while allowing water vapor to escape. This prevents moisture from becoming trapped in your walls, which can cause rot and mold.
Sheathing
The structural backing attached to your home’s frame, typically made of plywood or oriented strand board (OSB). Both the house wrap and siding panels attach to this layer, which provides rigidity and strength to your exterior walls.
Insulation Layer
An optional component that can be installed as rigid foam boards between the sheathing and siding panels. This layer improves your home’s thermal envelope, reducing energy costs and improving comfort year-round.
Trim and Finishing Components
These pieces create clean transitions, cover joints, and ensure professional-looking installations while maintaining the system’s weather resistance.
J-Channel
A trim piece shaped like the letter “J” in profile, commonly used with vinyl siding to create finished edges around windows and doors. The channel holds siding panel edges securely while directing water away from vulnerable openings.
Corner Posts
Vertical trim pieces that finish exterior and interior corners where walls meet. Outside corner posts are larger and more prominent, while inside corner posts handle areas where structures connect, such as where a garage meets the main house.
Starter Strips
Starter strips are the very first piece of siding installed on a wall. They run along the bottom edge of the exterior and create a level base for the entire system. Once in place, they provide a secure track that the first row of siding panels locks into.
Fascia
The board that runs along your roof’s lower edge, covering the ends of roof rafters. Gutters typically attach to the fascia, making its condition critical for proper water management around your home’s perimeter.
Soffit
The material covering the underside of roof eaves. Many soffits include ventilation to allow air circulation into your attic, which prevents moisture buildup and ice dam formation during winter months.
Water Management Elements
These components are installed at your home’s most vulnerable points to direct water away and prevent infiltration that could cause structural damage.
Flashing
Thin metal or composite material installed wherever siding meets different surfaces like roofs, chimneys, or decks. Flashing creates a waterproof barrier at seams that would otherwise allow water penetration behind your siding.
Drip Caps
L-shaped flashing pieces installed above windows and doors that direct rainwater away from the top of openings. This prevents water from running down frames and potentially infiltrating your home’s interior.
Window and Door Trim
Decorative molding that frames exterior openings while sealing gaps between siding and window or door frames. Beyond aesthetic appeal, this trim provides crucial protection against drafts and moisture infiltration.
How the Siding System Works Together
Your siding functions as an integrated system where each component plays a specific role in protection and performance.
Layered Weather Protection
The system creates multiple barriers against moisture. Siding panels shed the majority of rain and snow, while house wrap stops any water that penetrates the first layer. Flashing and drip caps channel water away from vulnerable connection points, creating comprehensive weather resistance.
Thermal Performance
Sheathing and siding provide basic insulation properties that improve when combined with dedicated insulation layers. This thermal envelope reduces heat transfer, lowering energy costs and improving interior comfort throughout the year.
Structural Integration
All components work together to create both protection and visual appeal. Main panels provide the primary barrier and aesthetic foundation, while trim pieces define architectural lines and ensure professional-looking transitions between different surfaces.
Common Problems to Watch For
Even well-installed siding systems can develop issues over time. A siding system is only as strong as its weakest link, and recognizing failure signs in specific components prevents minor issues from becoming expensive structural damage.
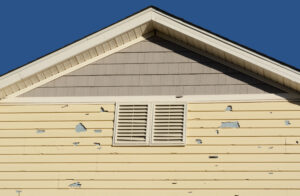
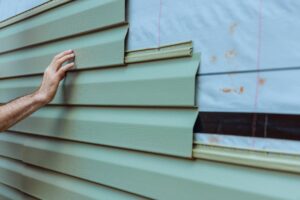
Panel Damage and Deterioration
Cracked, loose, or warped siding panels create the most visible failures and serve as entry points for multiple secondary problems.
Primary Causes
- Physical impacts from hail, wind-blown debris, or accidental contact
- Weather stress from high winds that can rip panels from fastenings
- Material aging as vinyl becomes brittle from UV exposure and temperature shifts
- Installation issues with inadequate fastening or improper panel alignment
Warning Signs
- New cracks or holes visible after storms
- Rattling or flapping sounds during windy conditions
- Panels that appear loose, bulging, or have visible gaps between rows
- Brittle areas that crack easily when touched
These openings allow rainwater and pests direct access to your home’s weather barrier and structural components underneath.
Soffit and Fascia Deterioration
The components along your roofline face constant exposure to moisture from above and are particularly vulnerable to water-related damage.
Damaged fascia will not be able to support gutters properly, while compromised soffits block essential attic ventilation and provide pest entry points.
Common Damage Sources
- Clogged gutters causing continuous water overflow onto fascia boards
- Ice dams forcing melting snow under shingles to saturate roof edge components
- Poor attic ventilation trapping moisture that condenses on soffit materials
- Roof leaks allowing water penetration from above
Critical Warning Signs
- Peeling paint, dark stains, or visible sagging along the roofline
- Gutters pulling away from the house or hanging loosely
- Signs of animal nests or entry points in eaves
- Soft spots when pressing on fascia or soffit materials
Flashing and Trim Failures
While less obvious than panel damage, failed flashing represents one of the most serious threats because it channels water directly into wall cavities.
| Component | Failure Point | Consequence | Detection Method |
| Window flashing | Missing drip cap | Water enters wall above opening | Interior stains near windows |
| Corner trim | Unsealed joints | Wind-driven rain penetration | Cracked or missing caulk |
| Roof transitions | Improper installation | Structural water damage | Hidden until interior damage appears |
| Door thresholds | Gap development | Foundation moisture issues | Soft spots on interior walls |
Installation-Related Problems
Most flashing failures stem from improper installation where contractors cut corners, forgot components, or left unsealed gaps. Storm damage can occasionally dislodge properly installed trim pieces.
Interior Warning Signs
Since flashing problems often remain hidden behind siding, watch for interior symptoms including water stains on walls or ceilings near windows, bubbling paint, or soft spots on drywall that indicate hidden moisture infiltration.
Advanced Moisture Damage
When water repeatedly bypasses exterior barriers, it creates the most serious and expensive siding system failure.
Water that penetrates through cracks, gaps, or missing flashing becomes trapped between the house wrap and structural sheathing. While house wrap prevents further inward migration, it also prevents the saturated sheathing from drying effectively, creating ideal conditions for mold growth and wood rot.
Prevention Strategy
Address small exterior problems immediately before they allow moisture penetration. Regular inspection and prompt repair of minor issues like cracked caulk or loose trim prevents the conditions that lead to serious structural damage.
Maintenance and Inspection Guidelines
Regular inspection and maintenance protect your investment and prevent small problems from becoming major repairs. Dedicating a small amount of time each season ensures your home’s first line of defense remains strong and effective.
Spring Inspection
Winter weather can be particularly harsh on siding systems. Once snow and ice have melted, examine your home for damage caused by moisture, temperature fluctuations, and ice formation.
- Look for cracks and holes in siding panels, especially vinyl which can become brittle in cold temperatures. Check for loose panels that may have been affected by high winter winds – look for rattling, bulging, or visible gaps between rows.
- Inspect soffits and fascia for peeling paint, dark stains, or soft spots that indicate water damage from ice dams or clogged gutters. Examine caulk seals around windows, doors, and trim for areas where caulking has cracked, shrunk, or pulled away.
- For wood or fiber cement siding, assess paint condition and check for any peeling, blistering, or chipping that may have worsened over winter.
Fall Inspection
Preparing your siding for winter focuses on sealing vulnerabilities and clearing debris that could cause problems during harsh weather.
- Clean gutters and downspouts completely of leaves and debris. Clogged gutters are a primary cause of water damage to fascia, soffits, and siding directly below them.
- Inspect for pest activity as insects and rodents seek warm winter shelter. Look for small holes, nests in corner posts, or sawdust trails near wood siding.
- Trim landscaping by cutting back tree branches, shrubs, or vines touching or close to siding. This prevents scratching, allows proper air circulation, and removes bridges for pests.
- Check shaded, damp areas (typically north-facing sides) for new signs of mold or algae growth.
Cleaning Methods and Best Practices
Regular cleaning removes dirt, grime, and organic growth that can prematurely age your siding while boosting curb appeal.
Standard Cleaning Approach
For most siding types including vinyl, fiber cement, and metal, use a soft-bristle brush with a long handle and mild soapy water. Gently scrub in sections, working from bottom to top to prevent streaking, then rinse thoroughly with a garden hose from top to bottom.
Mold and Mildew Removal
For stubborn mold or algae stains, apply a solution of one part white vinegar to three parts water using a spray bottle. Let it sit for several minutes, gently scrub, then rinse completely.
Pressure Washing Precautions
Use extreme caution with pressure washers. While effective, they can easily damage siding if pressure is too high or the nozzle is held too close. High pressure can force water behind panels, trapping moisture and causing long-term damage.
If you use a pressure washer, select the lowest pressure setting, use a wide-angle fan tip, and spray at a downward angle while maintaining safe distance from the wall. Never pressure wash wood siding, as it can strip paint and damage wood fibers.
Repair vs. Replacement Decision
Understanding when to repair versus replace components can save significant time, money, and stress while ensuring appropriate solutions.
| Situation | Repair | Replace |
| Scope of damage | Localized to 1-2 panels or small areas | More than 30-40% of siding affected |
| Age of siding | Well within expected lifespan | Near or past expected lifespan (20-40 years) |
| Type of problem | Surface issues, minor cracks, isolated damage | Structural damage, widespread deterioration |
| Energy performance | System still performs well | Chronically high energy bills |
| Underlying issues | No moisture penetration behind siding | Soft/spongy panels indicating rot underneath |
Repair Makes Sense When:
- Damage is confined to small, isolated areas from specific incidents like storms
- Issues are minor cosmetic problems that can be addressed with simple fixes
- The surrounding siding system remains in excellent condition
- Problems involve easily replaceable components like caulking or individual panels
Full Replacement is Warranted When:
- Extensive deterioration affects multiple sections requiring numerous individual repairs
- Siding has reached its expected lifespan and shows widespread failure signs
- You discover structural damage underneath requiring full removal for proper access
- You want major aesthetic changes that justify starting fresh with new materials
Conclusion
Your home’s siding system consists of multiple interconnected components that work together to protect your structure and investment. Understanding how panels, house wrap, trim, and flashing function allows you to maintain the system effectively and address problems before they become costly repairs.
Regular inspection and maintenance of these components protects your home’s structural integrity while preserving its value and appearance. When professional work becomes necessary, your understanding of the system helps ensure you get appropriate solutions at fair prices.

Anna has over six years of experience in the home services and journalism industries and serves as the Content Manager at MyHomePros.com, specializing in making complex home improvement topics like HVAC, roofing, and plumbing accessible to all. With a bachelor’s degree in journalism from Auburn University, she excels in crafting localized, comprehensive guides that cater to homeowners’ unique needs. Living on both coasts of the United States has equipped her with a distinctive perspective, fueling her passion for turning any house into a cherished home through informed, personalized decision-making.
Connect with top-rated local contractors who can help you with siding, roofing, HVAC, windows, and more. Get free quotes from verified professionals in your area today.