A well-built siding system depends on multiple layers working together to protect the home and preserve its structure. Sheathing provides the solid base that supports the siding, while furring strips create a gap that improves airflow and drainage. Together, these components form a stronger wall assembly that resists moisture, increases durability, and supports energy efficiency.
When either layer is skipped or installed incorrectly, walls are more likely to trap moisture, which can lead to rot, mold, and long-term damage. Understanding how sheathing and furring strips work, and why they are considered best practice, is key to building a siding system that lasts. This guide explains their roles, the benefits they provide, and what proper installation should include.
What Is Sheathing in Siding Installation?
Sheathing is the foundational layer of panels or boards fastened directly to a home’s exterior wall studs. It is installed before the weather-resistant barrier and siding, creating the base that supports the rest of the wall system.
In new construction, sheathing is almost always required for structural integrity. By tying the wall studs together, it reinforces the frame and gives the wall greater rigidity. This extra stability is essential for withstanding both high winds and seismic loads, making sheathing a critical part of a safe and durable home.
Purpose of Sheathing in Siding
Sheathing plays multiple roles in protecting and supporting the exterior wall assembly. At its core, it provides structural backing, defends against the elements, and ensures a smooth surface for the siding installation.
Core Functions
- Structural reinforcement: Prevents racking, or side-to-side shifting of the wall, while adding overall stability.
- Solid attachment point: Creates a continuous, secure surface for fastening the weather-resistant barrier and siding.
- Weather defense: Shields the framing from wind and moisture, protecting the home’s interior structure.
Benefits of Sheathing for Siding
In addition to its primary functions, sheathing delivers long-term advantages that enhance both durability and energy performance.
- Enhanced structural strength: Strengthens the wall system, making it more rigid and resistant to outside forces.
- Improved weather protection: When combined with a weather-resistant barrier, it helps prevent wind and water from infiltrating the wall cavity.
- Added insulation: Some modern sheathing products, such as insulated foam boards, provide thermal resistance, improving energy efficiency and indoor comfort.
Types of Sheathing for Siding
Different sheathing materials are appropriate depending on structural needs, climate conditions, and project goals.
- Plywood: Strong, durable, and reliable. Plywood resists warping and holds fasteners securely, making it a traditional favorite for sheathing.
- Oriented Strand Board (OSB): A cost-effective alternative to plywood, made from compressed wood strands and resin. OSB provides good strength but is more susceptible to swelling when exposed to water.
- Foam Board (Insulated Sheathing): Lightweight panels that provide both sheathing support and added insulation. Foam boards improve energy efficiency but often need to be combined with structural sheathing.
- Gypsum Board (Glass-Mat Sheathing): A non-combustible, moisture-resistant option often used in commercial construction or in areas where fire protection is required.
Sheathing Materials Comparison
| Material | Pros | Cons | Best Uses |
| Plywood | Strong and durable; holds nails and screws well; resists warping | More expensive than OSB; limited resistance to long-term moisture | Homes needing high structural strength and durability |
| OSB | Affordable; widely available; good structural strength | Swells when exposed to water; can lose strength if moisture persists | Standard residential projects where budget is important |
| Foam Board | Adds insulation and energy efficiency; lightweight; easy to cut | Not structural on its own; usually combined with plywood or OSB | Homes requiring better insulation and energy efficiency |
| Gypsum Board | Fire resistant; moisture and mold resistant; smooth surface | Not as strong as wood-based sheathing; mainly used in commercial builds | Commercial projects or areas with strict fire-code requirements |
Actual costs depend on your location, project scope, and materials. The best way to know what you'll pay is to get quotes from local contractors.
Get Your Free Estimate →Best Practices for Installing Sheathing
Proper sheathing installation is essential for both structural strength and reliable weather protection. Following the right steps during preparation, installation, and finishing ensures the siding system performs as intended for many years.
Before Installation: Preparation and Planning
Careful planning helps prevent mistakes and ensures compliance with local requirements.
- Prepare the frame: All wall studs must be straight, level, and securely fastened to create a stable base.
- Choose materials: Select sheathing panels that meet building codes for thickness and shear requirements in your region.
- Consult codes: Verify the local standards for fastener types, spacing, and nailing schedules before starting.
During Installation: Proper Techniques
How panels are installed has a direct impact on the wall’s durability and resistance to outside forces.
- Install panels vertically, parallel to the studs, to maximize shear strength.
- Stagger vertical joints between panel rows so weak seams do not align.
- Leave a 1/8-inch gap between panels for expansion. In high-moisture climates, consider a 1/4-inch gap.
- Use manufacturer-recommended fasteners and spacing. Drive fasteners flush with the panel surface without overdriving.
- Install sheathing over window and door openings and cut them out afterward. Avoid placing panel joints within 12 inches of the corners of these openings, since that area is prone to stress and cracking.
After Installation: Protecting the Sheathing
Once the panels are in place, they need immediate protection to ensure long-term performance.
- Cover the sheathing promptly with a weather-resistant barrier such as housewrap. This serves as the primary shield against moisture infiltration.
- Properly flashing all windows, doors, and penetrations to prevent water from sneaking behind the sheathing and damaging the framing.
"We matched with a great contractor the same day. The whole process was easy and completely free."
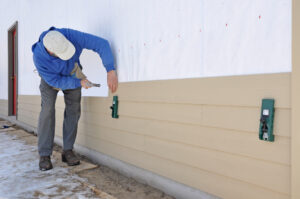
What Are Furring Strips?
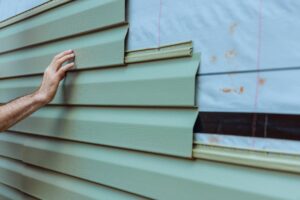
Furring strips are narrow pieces of wood, metal, or plastic that are installed over a home’s exterior sheathing and weather-resistant barrier. They serve as the backbone of a rainscreen system, creating both a secure and level surface for siding and a vital air gap that promotes ventilation and drainage. This simple addition significantly improves the performance and durability of a siding installation.
By lifting the siding slightly off the wall assembly, furring strips create a continuous cavity behind the siding. This space allows water that seeps through the siding to drain away while also enabling air to circulate. The combination of drainage and ventilation is one of the most effective ways to protect a home from moisture damage, rot, and mold.
Purpose of Furring Strips in Siding
Furring strips contribute to siding projects in several important ways:
- Drainage plane: The vertical gap channels water downward and out of the wall assembly.
- Ventilation: Circulating air within the cavity dries both the siding and the sheathing.
- Leveling: Strips correct irregular or uneven wall surfaces, ensuring the siding looks uniform.
- Secure backing: They provide a stable fastening base for attaching siding panels or boards.
Types of Furring Strips
Different materials are available to suit project requirements, budgets, and climates. Common types of furring strips include traditional wood strips, metal channels (such as “hat channels”), and modern plastic strips designed with drainage channels to enhance moisture management.
- Wood furring strips: Typically softwood lumber in dimensions such as 1×2 or 1×3.
- Metal furring channels: Often called hat channels, made of galvanized steel, and common in commercial construction.
- Plastic furring strips: Lightweight, durable, and resistant to mold, insects, and rot.
Furring Strip Materials Comparison
| Material | Pros | Cons | Best Uses |
| Wood | Inexpensive, easy to cut, widely available | Susceptible to rot, mold, and pests unless treated | Residential projects where budget is key and conditions are dry or moderate |
| Metal | Strong, durable, fire-resistant, and non-combustible | More expensive; requires cutting tools; can transfer heat or cold | Commercial projects or homes needing high durability and fire resistance |
| Plastic | Lightweight, rot-proof, pest resistant, and easy to handle | Higher upfront cost; less structural strength than wood or metal | Homes in damp or pest-prone climates, or projects needing low-maintenance materials |
Best Practices for Installing Furring Strips
Correct furring strip installation is key to creating an effective rainscreen system. It requires careful planning and execution regarding material selection, orientation, spacing, and integration with other wall components like flashing.
Before Installation: Planning and Layout
- Choose rot-resistant or corrosion-resistant materials that are appropriate for the climate and siding type.
- Make sure the weather-resistant barrier is installed correctly over the sheathing before adding furring strips.
- Mark stud locations on the WRB to ensure every strip is securely fastened into the framing.
During Installation: Proper Techniques
- Install strips vertically when using horizontal siding, and create a grid of horizontal and vertical strips when using vertical siding.
- Follow the siding manufacturer’s recommended spacing, which is usually 16 or 24 inches on center.
- Use shims as needed to keep the strips plumb and to create a flat plane on older or uneven walls.
- Fasten the strips with corrosion-resistant screws or nails long enough to penetrate the strip, the WRB, and the sheathing, and securely bite into the wall studs.
After Installation: Integration with Flashing
- Add a continuous insect screen at both the top and bottom of the rainscreen cavity to prevent pests from getting inside.
- Make sure all windows, doors, and other penetrations are properly flashed so the rainscreen system works seamlessly with the rest of the wall assembly.
Benefits of Using Sheathing and Furring Strips Together
Combining sheathing and furring strips creates a robust, multi-layered wall system that offers long-term benefits for your home. The result is an exterior that lasts longer and protects better against environmental stress.
Superior Moisture Management and Drainage
The rainscreen cavity formed by furring strips adds an extra layer of moisture protection. This gap prevents water from getting trapped against the sheathing, reducing the risk of damage. In rainy or humid climates, this feature is especially important for keeping walls dry and preventing mold or rot.
Why Hire a Licensed Professional
- Licensed & insured — protects you from liability
- Warranty coverage — manufacturers require pro installation
- Code compliance — avoids permit issues
- Faster completion — pros finish in days, not weeks
Enhanced Durability and Longevity of Siding
When siding is able to drain and dry properly, both the siding itself and the underlying structure remain protected. This reduces the likelihood of problems such as warping, rot, and premature failure, which extends the life of the home’s exterior.
Improved Energy Efficiency
The air gap between the siding and sheathing also acts as a thermal break. By reducing heat transfer through the wall, the system helps regulate indoor temperatures and can contribute to lower energy bills over time.
Leveling Uneven Walls
In older homes, walls are not always perfectly flat or plumb. Furring strips correct these issues by creating a uniform surface, which ensures the siding has a professional finish and installs securely.
When to Use Sheathing and Furring Strips Together
While sheathing is a standard requirement, the decision to add furring strips for a rainscreen depends on several factors, including the type of siding, the local climate, and the condition of the existing wall.
DIY vs. Professional: At a Glance
For Wood Siding and Moisture-Sensitive Materials
Both sheathing and furring strips should be used when installing wood or other porous siding materials. The ventilation gap created by the strips helps moisture escape and protects these materials from rot and decay.
In Wet or Humid Climates
Homes in regions with heavy rainfall or consistently high humidity benefit greatly from rainscreen systems. The added ventilation helps prevent water from lingering in the wall assembly, which reduces the risk of damage.
With Exterior Rigid Foam Insulation
When rigid foam insulation is added to the outside of a wall for energy efficiency, furring strips are essential. They provide a secure nailing base for the siding and allow water to drain properly over the foam layer, which does not absorb moisture.
Over Uneven Masonry Walls
Applying siding over an older or uneven masonry wall is another situation where furring strips are necessary. They create a flat, consistent surface for the siding while also adding a drainage cavity to handle moisture that may be retained in the masonry.
Spring and summer are the busiest seasons for home improvement projects — top-rated contractors book up fast. Lock in your estimate now before demand peaks.
Check Availability in Your Area →When It Is Optional but Recommended
Even with non-wood siding materials such as fiber cement, using furring strips can be beneficial. The added air gap improves drainage, reduces maintenance concerns, and helps extend the life of the entire wall assembly.
FAQs
Do you need sheathing under vinyl siding?
Yes, sheathing is required under vinyl siding. The siding requires a solid, flat surface for proper installation and structural stability.
Ready to Move Forward?
Tell us about your project and get matched with up to 3 pre-screened contractors. Compare quotes, check reviews, and hire with confidence.
Can you install siding without furring strips?
Yes, but it is not recommended in most cases. Installing siding directly over the WRB and sheathing provides less protection than a rainscreen system, especially in wet or humid climates.
What thickness of sheathing is best for siding?
For most residential applications, 7/16-inch OSB or 1/2-inch plywood is standard. Thicker sheathing can be used for added strength.
How do furring strips improve ventilation?
Furring strips create an air gap that allows for passive airflow, helping to dry out the sheathing and the back of the siding. This prevents moisture from getting trapped and causing damage.
Are furring strips required by building code?
Not universally, but some local building codes, especially in specific climates, may require a rainscreen system for certain installations. It is always best to check with your local building department.
Conclusion
Using sheathing and furring strips together is a best-practice approach that results in a siding system built to last. Sheathing provides the structural base, while furring strips create a ventilated rainscreen that manages moisture and helps the exterior hold up over time. This preparation reduces the risk of costly repairs and supports a finish that stays durable and efficient.
For homeowners planning new siding or an upgrade, working with a qualified siding contractor is the surest way to get it right. A professional installer can select the right materials, follow proper techniques, and make sure your home is well protected for years to come.
Connect with top-rated local contractors who can help you with siding, roofing, HVAC, windows, and more. Get free quotes from verified professionals in your area today.