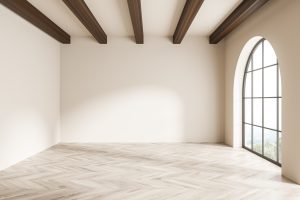
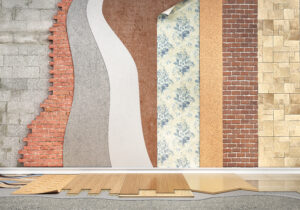
Your subfloor determines everything about how your hardwood installation will go, and most problems start because homeowners overlook it. Concrete slabs, plywood, and existing floors each demand different prep, different tools, and different installation methods. Skip a moisture test on concrete or nail directly into a slab, and you are looking at cupping, buckling, or a full tear-out within a year. This guide covers all three subfloor types step by step so you can match the right approach to your specific situation and get it right the first time.
Solid Hardwood vs. Engineered Wood: Which Fits Your Subfloor?
Solid hardwood is milled from a single piece of wood. Engineered wood bonds a hardwood veneer to a cross-ply core for superior moisture stability.
The distinction matters because each product responds differently to moisture, temperature swings, and the subfloor beneath it. Solid hardwood expands and contracts more with humidity changes, which limits where and how you can install it. Engineered wood’s cross-ply construction resists warping, making it compatible with concrete slabs, basements, and radiant heat systems where solid wood may fail.
A wood species’ Janka hardness rating also affects long-term performance. Harder species like hickory (1,820 Janka) resist dents and traffic wear better than softer options like pine (690 Janka). Factor hardness into your selection if the room sees heavy foot traffic or pets.
| Feature | Solid Hardwood | Engineered Wood |
|---|---|---|
| Construction | Single piece of wood | Hardwood veneer over plywood/HDF core |
| Thickness | Typically 3/4 inch | 3/8 to 3/4 inch |
| Refinishing | Can be sanded 3 to 5+ times | 1 to 3 times depending on wear layer |
| Moisture Resistance | Lower | Higher due to cross-ply core |
| Grade Level | On-grade or above-grade only | All grades including below-grade |
| Installation Methods | Nail-down, staple-down, glue-down | Float, glue-down, nail-down, staple-down |
| Cost (Materials) | $5 to $15 per sq ft | $3 to $14 per sq ft |
If you are choosing the best flooring for every room, start by identifying the grade level. Solid hardwood works best above grade on wood subfloors. Engineered wood is the safer pick for slabs, basements, and any room with higher moisture exposure.
The 4 Main Wood Floor Installation Methods
Wood flooring installs by one of four methods: nail-down, staple-down, glue-down, or floating. Your subfloor type determines which are available.
Nail-Down
A pneumatic floor nailer drives cleats at a 45-degree angle through the tongue of each plank and into the subfloor. This method requires a wood subfloor (plywood or OSB) at least 3/4 inch thick with joists spaced no more than 16 inches on center. It produces the most solid, traditional feel underfoot and works for both solid and engineered hardwood.
Staple-Down
Similar to nail-down but uses 18-gauge staples instead of cleats. It’s faster and works well for engineered planks up to 9/16 inch thick. Like nailing, this method requires a wood subfloor and cannot be used directly on concrete.
Pro Tip: For engineered planks wider than 5 inches, consider a glue-assist method. Apply a bead of urethane adhesive along the subfloor in addition to stapling. This reduces squeaking and adds stability that staples alone may not provide on wide boards.
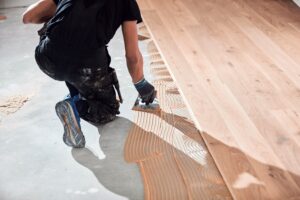
Glue-Down
A urethane or epoxy adhesive is troweled onto the subfloor before planks are pressed into place. Glue-down works on both concrete and plywood subfloors. It creates excellent stability in high-traffic areas and acts as a secondary moisture barrier when the right adhesive is used. When selecting adhesives, look for low-VOC formulations that meet EPA indoor air quality guidelines to minimize off-gassing in occupied spaces. Labor costs run slightly higher because the process is slower and cleanup is more involved.
Floating
Planks connect to each other through a click-lock or tongue-and-groove system and rest on top of the subfloor without being attached to it. A foam or cork underlayment cushions the floor and provides sound dampening. Floating installation is the most DIY-friendly method and the fastest to complete, but it can feel slightly less solid underfoot compared to nailed or glued floors.
| Method | Compatible Subfloors | Best For | Avg. Labor Cost |
|---|---|---|---|
| Nail-down | Plywood, OSB | Solid hardwood, engineered 18mm+ | $3 to $6/sq ft |
| Staple-down | Plywood, OSB | Engineered hardwood up to 9/16 in | $3 to $5/sq ft |
| Glue-down | Concrete, plywood | Engineered hardwood, some solid | $4 to $8/sq ft |
| Floating | Concrete, plywood, existing floors | Engineered hardwood with click-lock | $3 to $5/sq ft |
Which Method Fits Your Project?
Use this decision tree to match your subfloor and product to the right installation method.
| Your Situation | Recommended Method | Product Type |
|---|---|---|
| Below-grade room (basement) on concrete | Float or glue-down | Engineered wood only |
| Slab-on-grade concrete, main level | Glue-down or float | Engineered wood (preferred) or solid with plywood overlay |
| Plywood/OSB subfloor, above grade | Nail-down or staple-down | Solid or engineered |
| Over existing hardwood | Float (perpendicular) or add plywood + nail-down | Engineered wood (preferred) |
| Over vinyl or tile | Float only | Engineered wood only |
| Radiant heat system | Float (preferred) or glue-down | Engineered wood only |
How Do You Prepare a Subfloor for Hardwood Installation?
Every subfloor must be clean, dry, level within 3/16 inch per 10 feet, and structurally sound before any hardwood or engineered wood is installed.
Skipping or rushing subfloor prep is the most common source of flooring problems down the road. Warping, buckling, squeaking, and adhesive failure almost always trace back to inadequate preparation.
Cleaning and Inspection
Remove all existing flooring materials, adhesive residue, paint, and debris. Inspect for cracks, soft spots, and protruding fasteners. Hammer down any raised nail heads or screw them flush. If the subfloor has widespread damage or rot, those sections must be replaced before installation begins. Avoiding these early steps is one of the most costly flooring installation mistakes.
Checking for Level
Run a 10-foot straightedge or level across the floor in multiple directions. The NWFA standard tolerance is 3/16 inch of variation over 10 feet. Grind down high spots with a concrete grinder (for slabs) or a belt sander (for plywood). Fill low spots with a cementitious self-leveling compound and allow it to cure fully before proceeding. Pay attention to subfloor deflection as well. Excessive bounce or flex in a plywood subfloor typically signals undersized joists or inadequate fastening to the framing.
Moisture Testing
Moisture is the single biggest threat to a hardwood floor. Testing is mandatory regardless of subfloor type.
- Concrete slabs: Use an in-situ relative humidity (RH) test per ASTM F2170. The slab should read below 75% RH for most adhesive installations, though some manufacturers set stricter limits. Calcium chloride tests (ASTM F1869) offer a supplementary check. New concrete must cure at least 60 days before testing.
- Wood subfloors: Use a pin-type or electromagnetic moisture meter. The subfloor and the flooring material should be within 2 to 4 percentage points of each other. Neither should exceed 12% moisture content.
Warning: Never skip moisture testing, even in dry climates. Concrete continues to release moisture for years after pouring, and seasonal humidity shifts can push wood subfloors past safe thresholds. Testing takes minutes and prevents thousands of dollars in damage.
How Long Does Hardwood Flooring Need to Acclimate?
Most manufacturers require 3 to 5 days of acclimation, though some engineered products with stable cores need as little as 48 hours.
Acclimation allows the wood to reach equilibrium with the temperature and humidity of the room where it will be installed. Skipping this step is a leading cause of post-installation gaps, buckling, and cupping.
Leave the flooring in its unopened boxes in the room where it will be installed. The space should be at normal living conditions: temperature between 60 and 80 degrees Fahrenheit and relative humidity between 30% and 50%. Before installation day, open several boxes and check moisture content with a meter. The flooring should be within 2 to 4 percentage points of the subfloor.
Pro Tip: Check the Janka hardness rating of your chosen species before finalizing. High-traffic areas and homes with pets benefit from harder species like white oak (1,360 Janka) or hickory (1,820 Janka). Softer woods like walnut (1,010 Janka) show dents more quickly and may need refinishing sooner.
Installing Hardwood and Engineered Wood on Concrete Slabs
Concrete slab installations require a vapor retarder, a fully cured slab, and either a glue-down or floating method for engineered wood.
Concrete slabs present two challenges that wood subfloors do not: moisture migration through the porous surface and the inability to accept nails or staples directly. The approach varies based on whether you are installing solid hardwood or engineered wood.
Engineered Wood on Concrete
Engineered hardwood is the preferred choice for concrete because its layered construction handles moisture fluctuation better than solid wood.
Glue-down method:
- Confirm the slab is clean, flat, and dry (RH below 75% or per manufacturer specs).
- Apply a moisture-blocking primer if the adhesive manufacturer recommends one.
- Spread urethane adhesive over a workable section using the trowel size specified by the adhesive manufacturer.
- Set planks into the adhesive, staggering end joints by at least 6 inches between adjacent rows.
- Use a tapping block and rubber mallet to snug joints together without displacing adhesive.
- Wipe excess adhesive immediately with manufacturer-recommended solvent.
- Keep foot traffic off the floor for 24 hours while the adhesive cures.
Floating method:
- Lay a 6-mil polyethylene vapor retarder over the slab, overlapping seams by at least 6 inches and taping them.
- Roll out foam or cork underlayment on top of the retarder (some products combine both layers into one sheet).
- Begin in a corner, placing spacers against the wall to maintain a 1/4-inch expansion gap.
- Click or lock planks together row by row, staggering end joints by at least 6 inches.
- Cut the final row to width, accounting for the expansion gap on both sides.
Solid Hardwood on Concrete
Solid hardwood requires an intermediary subfloor because it must be nailed or stapled down, and it is more vulnerable to moisture.
Plywood-on-slab system:
- Apply a vapor retarder (6-mil polyethylene or asphalt felt with mastic) over the entire slab.
- Lay 3/4-inch exterior-grade plywood panels over the retarder, leaving 1/4-inch gaps between panels for expansion.
- Fasten the plywood to the concrete with powder-actuated fasteners or concrete screws every 12 inches in both directions.
- Nail or staple the solid hardwood to the plywood using a pneumatic floor nailer.
Sleeper system:
- Install the vapor retarder over the slab.
- Lay pressure-treated 2×4 sleepers flat, spaced 12 to 16 inches on center, shimming as needed for level.
- Top the sleepers with 3/4-inch plywood or 3/4-inch OSB, fastened to the sleepers.
- Install hardwood flooring over the plywood layer using nail-down or staple-down methods.
Pro Tip: Sleeper systems raise the finished floor height by about 2-1/2 inches, which can create problems at doorways, T-molding transitions, and stairs. Measure ceiling and door clearances before committing to this method.
A Note on Radiant Heat Systems
If your concrete slab has in-floor radiant heating, use floating engineered wood. The cross-ply core handles the heat cycling without splitting or excessive shrinking. Solid hardwood over radiant heat tends to dry out, develop checking (small surface cracks), and produce persistent gaps between planks. The heating element must be embedded at least 1/2 inch in the concrete, and surface temperature should never exceed 85 degrees Fahrenheit. Always verify compatibility with both the flooring and radiant system manufacturers before installation.
If you are installing in a basement, review the additional moisture considerations in our guide to basement moisture problems and solutions.
How Do You Install Wood Flooring on a Plywood or OSB Subfloor?
Plywood and OSB subfloors support all four installation methods and offer the most flexibility for solid and engineered wood.
Wood-over-wood installations are the most common scenario in homes with standard joist framing. The subfloor should be at least 3/4 inch thick, structurally sound, and securely fastened to the joists with no more than 16 inches of joist spacing.
Step-by-Step Nail-Down Installation
- Acclimate the flooring. Store unopened boxes in the installation room for 3 to 5 days (or per the manufacturer’s instructions) so the wood adjusts to ambient temperature and humidity.
- Install underlayment. Roll out 15-pound builder’s felt or rosin paper over the subfloor in the same direction as the planned flooring layout. Overlap seams by 4 inches.
- Establish a starting line. Measure from the longest or most visible wall, subtract the expansion gap (typically 1/2 inch), and snap a chalk line.
- Lay the first row. Place planks tongue-side facing the room. Pre-drill and face-nail the first row since the nailer cannot reach this close to the wall. Use finishing nails about 1 inch from the wall edge.
- Begin blind-nailing. After the first two rows, switch to the pneumatic floor nailer. Drive fasteners at a 45-degree angle through the tongue every 6 to 8 inches and within 1 to 3 inches of each end.
- Stagger end joints. Offset seams by at least 6 inches between adjacent rows. Randomize lengths for a natural look.
- Cut around obstacles. Use a jigsaw or oscillating multi-tool for door casings, columns, and vent openings. Undercut door jambs with a flush-cut saw so planks slide beneath.
- Install the last row. Rip the final row to width, leaving the expansion gap. Face-nail and pre-drill as with the first row.
- Install trim. Attach baseboards to the wall (not the floor) to conceal expansion gaps. Add shoe molding, quarter-round, or T-molding at transitions to adjacent rooms.
For a full walkthrough of project timelines and contractor coordination, see what to expect during flooring installation.
Can You Put New Hardwood Over Existing Floors?
Yes. New hardwood or engineered wood can go over most existing floors if the surface is flat, dry, sound, and clears height transitions.
The key conditions are the same as any subfloor: flatness within 3/16 inch per 10 feet, moisture content within acceptable range, and structural integrity. Beyond that, the type of existing floor determines what methods are available.
Over Existing Hardwood
You can install new hardwood directly over old hardwood, but the new floor must run perpendicular or at a 45-degree angle to the existing planks. If you need to run the new floor parallel to the old one, add a layer of at least 3/8-inch plywood over the existing surface first. Secure any loose boards in the existing floor with ring-shank nails or screws before laying anything on top.
Engineered wood is the easier product to use here. A floating installation over the old hardwood avoids the need to nail through two layers of wood. Glue-down is also possible but requires more prep to ensure the old surface is clean and will accept adhesive.
Over Vinyl or Linoleum
A single layer of well-adhered vinyl or linoleum can serve as a substrate for a floating engineered floor. Remove any loose edges, bubbles, or damaged sections first. Do not install over multiple layers of vinyl, and never nail or staple through vinyl because it compromises moisture protection.
Over Tile
Tile is a viable substrate for floating or glue-down engineered wood as long as the tile is flat and firmly adhered. Cracked or loose tiles must be repaired or removed first. The additional height from the tile layer can create transition challenges at doorways.
Warning: Do not install new hardwood over carpet, padded flooring, or particle board. Carpet traps moisture and creates an unstable surface. Particle board swells when exposed to moisture and will not hold fasteners reliably.
Height and Transition Concerns
Adding a new floor on top of an existing one raises the finished height by 3/8 to 3/4 inch depending on the product. Check clearance at exterior doors, appliances (dishwashers and refrigerators especially), cabinet toe kicks, and stair nosings before committing. T-molding and reducer strips between rooms at different heights help manage the step-up, but large differences may look and feel awkward.
Common Installation Problems and How to Prevent Them
Most hardwood flooring failures trace back to moisture, subfloor prep, or improper fastening rather than defective materials.
Understanding what can go wrong helps you recognize warning signs early and avoid expensive repairs.
- Cupping: Plank edges rise higher than the center. This typically results from moisture migrating upward through the subfloor. The fix is addressing the moisture source, not sanding the floor flat while it is still wet.
- Crowning: The center of each plank is higher than the edges. This often follows a cupping episode where the floor was sanded before it fully dried. It can also result from surface moisture exposure like wet mopping.
- Buckling: Planks lift away from the subfloor entirely. Causes include no expansion gap at walls, extreme moisture spikes, or fasteners that failed to grip.
- Squeaking: Usually caused by subfloor movement or inadequate fastening. In nail-down installations, squeaking often means the subfloor was not secured tightly to the joists before flooring went down.
- Telegraphing: Subfloor imperfections (seams, ridges, dips) show through the finished floor surface. This is common in floating installations where the underlayment was too thin to mask the irregularities beneath it.
For a deeper dive into prevention strategies during each phase of the project, see our guide to flooring installation mistakes to avoid.
Essential Tools and Materials Checklist
A successful hardwood installation requires standard carpentry tools plus a few specialty items matched to your chosen installation method.
Tools for Every Method
- Tape measure, chalk line, and speed square
- Rubber mallet and tapping block
- Circular saw or miter saw for crosscuts
- Jigsaw or oscillating multi-tool for notch cuts
- Flush-cut saw for undercutting door jambs
- Moisture meter (pin or electromagnetic)
- 10-foot straightedge or level
- Safety glasses, hearing protection, and knee pads
Method-Specific Tools
- Nail-down/staple-down: Pneumatic floor nailer or stapler, air compressor, finishing nailer for first and last rows
- Glue-down: Notched trowel (size per adhesive specs), adhesive solvent, knee kicker boards
- Floating: Pull bar for closing end joints, spacers (1/4-inch)
Materials
- Hardwood or engineered flooring (order 10% extra for cuts and waste)
- Underlayment or vapor retarder (type matched to subfloor)
- Adhesive (if glue-down; choose low-VOC formulations)
- Transition strips (T-molding, reducers), baseboards, quarter-round molding
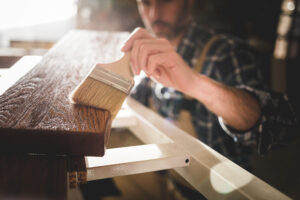
- Wood filler matching the floor color
Understanding total project costs, including materials, labor, and unexpected prep work, helps you set a realistic budget. Our flooring installation cost guide breaks down pricing by material type and installation method.
DIY vs. Professional Installation: Cost and Skill Breakdown
Floating engineered floors suit most DIY homeowners. Nail-down and glue-down methods require specialized tools and hands-on experience.
A floating floor installation involves simple click-and-lock assembly, minimal specialty tools, and a forgiving margin for error. Most handy homeowners can complete a standard room in a weekend.
Nail-down installation requires a pneumatic floor nailer, which can be rented, but operating one at the correct angle and pressure takes practice. Poorly driven fasteners split tongues, leave gaps, or dimple the face of the boards. Glue-down work demands precise adhesive coverage, timing (open time on adhesive is limited), and meticulous cleanup.
Hiring a professional is worth the cost in these scenarios:
- Concrete slab installations requiring moisture mitigation
- Rooms with complex layouts, angled walls, or heavy obstacle cutting
- Wide-plank solid hardwood (more prone to expansion issues if not fastened correctly)
- Any installation where the subfloor needs leveling or structural repair
- Pattern installations like herringbone or chevron
Professional labor typically costs between $3 and $8 per square foot, depending on method and complexity. For a breakdown of total project costs, see how much hardwood floors should cost.
If you go the professional route, vetting contractors carefully protects your investment. Our guide to finding the right contractor covers the essential questions to ask before signing a contract.
Final Takeaway
Hardwood flooring installation follows the same core principles whether you are working over concrete, plywood, or old hardwood. The substrate must be flat, dry, and structurally sound. The specific method you use and the product you choose determine the tools, timeline, and skill level required. If moisture testing, subfloor prep, and acclimation feel like unnecessary steps, they are exactly the steps that prevent the most expensive problems. Get the foundation right, and the floor takes care of itself.
Ready to install hardwood or engineered wood flooring in your home? Connect with experienced flooring installers in your area and get free, no-obligation quotes to compare pricing, timelines, and installation methods for your specific subfloor.

Anna has over six years of experience in the home services and journalism industries and serves as the Content Manager at MyHomePros.com, specializing in making complex home improvement topics like HVAC, roofing, and plumbing accessible to all. With a bachelor’s degree in journalism from Auburn University, she excels in crafting localized, comprehensive guides that cater to homeowners’ unique needs. Living on both coasts of the United States has equipped her with a distinctive perspective, fueling her passion for turning any house into a cherished home through informed, personalized decision-making.
Connect with top-rated local contractors who can help you with siding, roofing, HVAC, windows, and more. Get free quotes from verified professionals in your area today.