A cracked panel or a quarter-sized hole in your siding might not look like a big deal. But left alone for a season, that small opening becomes a highway for water, insects, and mold to reach the sheathing and framing behind your walls. Siding repairs are one of the few home maintenance tasks where acting fast can save you thousands of dollars in structural damage later.
This guide walks you through how to assess siding damage, patch and repair the most common siding materials, choose the right tools, and decide when a repair makes sense versus when you need a professional.
What Causes Siding Damage in the First Place?
Siding damage results from weather exposure, physical impact, moisture intrusion, pest activity, and normal aging of materials over time.
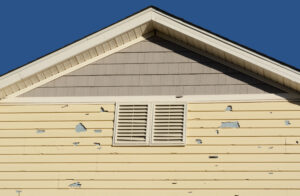
Your siding takes a beating from every direction. Hailstorms crack vinyl and dent aluminum. Wind-driven debris punches holes through panels. Tree branches scraping against a wall slowly grind through paint and surface material until bare wood or fiber cement is exposed.
But weather is only part of the story. Poor installation is responsible for a surprising number of siding failures. Panels nailed too tightly cannot expand and contract with temperature changes, which leads to buckling and warping. Missing or improperly installed flashing around windows and corners allows water to seep behind the cladding, where it rots sheathing and breeds mold.
Other common causes include:
- Woodpecker damage and insect boring, which create entry points for moisture
- Lawn equipment strikes, particularly from string trimmers and mowers throwing rocks
- UV degradation, which makes vinyl brittle and causes paint to peel on wood siding
- Ground splash-back, where soil and water repeatedly hit the lowest courses and accelerate rot
Understanding what caused the damage matters because it determines whether a surface patch will hold or whether you need to address a deeper problem first.
How Do You Assess Siding Damage Before Repairing It?
Probe the damaged area with a screwdriver to check for soft spots, then inspect the house wrap and sheathing for hidden moisture damage.
Before you cut, fill, or replace anything, you need to know exactly what you are working with. A crack that looks cosmetic on the surface might be hiding rot underneath, and patching over rot just delays a much more expensive repair.
Visual Inspection
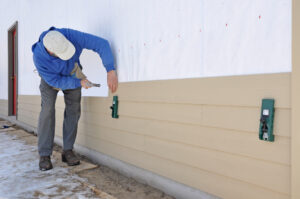
Walk the perimeter of your home and look for common signs of siding problems like cracks, holes, warping, bubbling paint, discoloration, and loose or missing panels. Pay close attention to areas around windows, doors, and utility penetrations, as these are the most vulnerable spots for water entry.
The Probe Test
For wood and fiber cement siding, press a flathead screwdriver into the damaged area. If the material feels spongy or the screwdriver sinks in with little resistance, the damage goes deeper than the surface. Soft spots indicate rot that a surface patch will not fix.
Actual costs depend on your location, project scope, and materials. The best way to know what you'll pay is to get quotes from local contractors.
Get Your Free Estimate →Check Behind the Siding
Whenever you remove a damaged panel or section, inspect the house wrap, sheathing, and any visible framing. Look for water stains, dark spots, and mold growth. If the house wrap is torn or the sheathing shows signs of moisture damage, those issues need to be addressed before any new siding goes back up.
Pro Tip: If you find widespread soft spots or mold behind multiple panels, stop the repair and call a contractor. What looks like a siding problem may actually be a water management issue that requires professional diagnosis.
What Tools and Materials Do You Need for Siding Repairs?
Most siding repairs require a zip tool, pry bar, utility knife, caulk gun, tape measure, and material-specific patching compounds.
Having the right tools before you start prevents mid-project hardware store runs. The exact list depends on your siding material, but most repairs draw from a common toolkit.
Essential Tools for All Siding Types
| Tool | Purpose |
|---|---|
| Zip tool (siding removal tool) | Unlocks interlocking vinyl and aluminum panels |
| Flat pry bar | Removes nails and lifts panels without damage |
| Utility knife | Scores and trims siding material |
| Caulk gun | Applies sealant to gaps and small holes |
| Tape measure | Ensures accurate replacement piece sizing |
| Speed square | Marks straight cut lines on replacement pieces |
| Hammer or nail gun | Secures replacement panels |
| 220-grit sandpaper | Preps surfaces for patching compound and paint |
| Safety glasses and gloves | Protects against sharp edges and debris |
"We matched with a great contractor the same day. The whole process was easy and completely free."
Material-Specific Supplies
For vinyl siding, you will need color-matched caulk, foil tape for backing small holes, and replacement panels that match the profile and color of your existing siding. For wood siding, stock exterior-grade wood filler or two-part epoxy filler, stainless steel ring-shank nails, primer, and matching exterior paint. For fiber cement siding, look for a fiber cement repair kit or cementitious patching compound, along with galvanized nails and paint rated for fiber cement surfaces.
How Do You Repair Vinyl Siding?
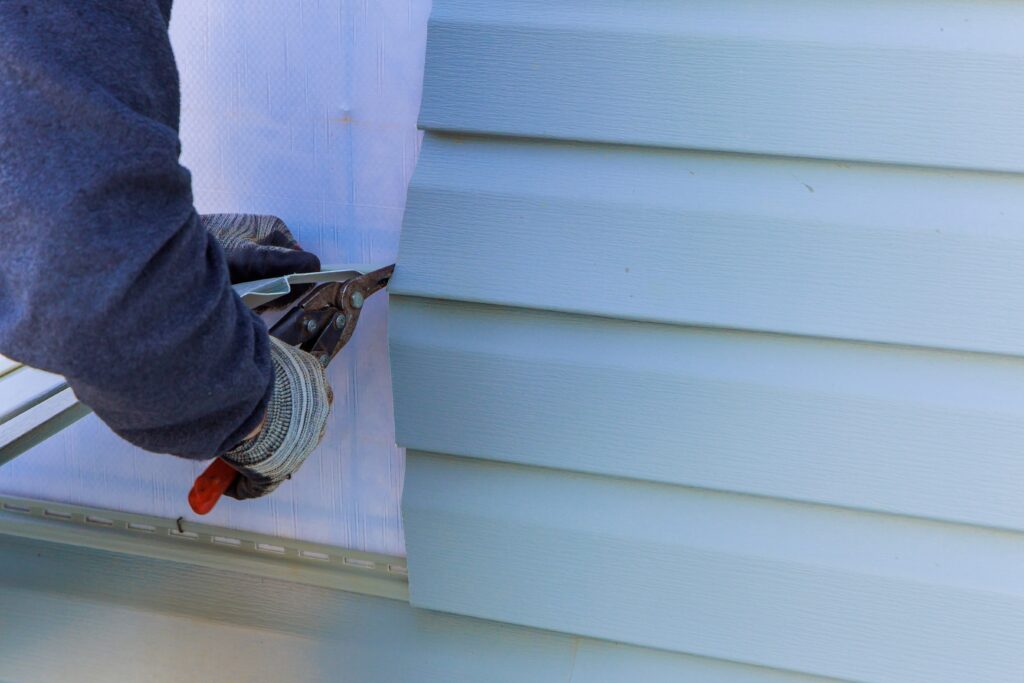
Patch small holes with color-matched caulk or filler, and replace cracked or broken panels by unlocking them with a zip tool.
Vinyl is the most common residential siding material in the U.S., and the good news is that it is also one of the easiest to repair. The interlocking panel design means you can remove and replace individual pieces without disturbing the rest of the wall.
Patching Small Holes (Under 1 Inch)
Clean the area around the hole with warm water and a cloth. Press down any raised edges with a putty knife. Apply exterior-grade filler or color-matched caulk to fill the hole, then smooth it flush with the surrounding surface. Once dry, sand lightly with 220-grit sandpaper and touch up with exterior paint rated for vinyl if the filler does not match.
For medium holes, apply foil tape to the back of the panel first (using a zip tool to lift it slightly), then fill the front with patching compound for a more stable repair.
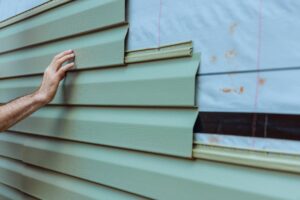
Replacing a Damaged Panel
This is the most common vinyl siding repair, and it takes about 15 to 20 minutes once you have a replacement panel on hand.
- Use the zip tool to unlock the bottom lip of the panel directly above the damaged one.
- Slide the zip tool along the full length to separate the panels.
- Lift the upper panel and use a flat pry bar to remove the nails holding the damaged panel.
- Pull the damaged panel free from the panel below it.
- Check the house wrap for tears or damage and patch with house wrap tape if needed.
- Slide the replacement panel into the bottom lock of the panel below.
- Nail through the nailing flange, leaving approximately 1/32 inch of space between the nail head and the panel so the vinyl can expand and contract freely.
- Use the zip tool to lock the upper panel back over the replacement.
Important: Never nail vinyl siding tight. The panels need room to move with temperature changes. A panel nailed too tightly will buckle in summer heat.
Color Matching Challenges
Vinyl siding fades over time, so a brand-new replacement panel will almost certainly look different from the surrounding panels. One effective workaround is to take a panel from an inconspicuous area of your home, like behind a downspout or under an overhang, and use it for the visible repair. Then install the new panel in the hidden location.
How Do You Repair Wood Siding?
Wood siding repairs range from filling small cracks with epoxy filler to cutting out and replacing rotted clapboard sections.
Wood siding requires more skill and patience than vinyl, but most homeowners with basic carpentry tools can handle localized repairs. The key is catching damage early, because rot spreads fast once moisture gets into wood grain.
Why Hire a Licensed Professional
- Licensed & insured — protects you from liability
- Warranty coverage — manufacturers require pro installation
- Code compliance — avoids permit issues
- Faster completion — pros finish in days, not weeks
Filling Cracks and Small Holes
For damage that has not gone deeper than the surface, clean out any loose material and apply a two-part epoxy wood filler. Epoxy filler is stronger than standard wood putty and bonds to the surrounding wood, creating a repair that will not shrink or crack over time. Once cured, sand it smooth and apply primer followed by two coats of exterior paint.
Replacing a Rotted Section
When rot has penetrated through the board, surface fillers will not hold. You need to cut out the damaged section and splice in new wood.
Score a line across the damaged clapboard with a utility knife, being careful not to cut through the building paper behind it. Use a chisel or oscillating tool to remove the damaged section. Cut a replacement piece from matching lumber, using the removed section as a template. Apply a bead of exterior caulk along the top edge of the course below, slide the new piece into position, and nail with stainless steel ring-shank nails driven into studs. Countersink the nail heads slightly, fill with exterior wood filler, sand smooth, and prime and paint.
For ongoing wood siding maintenance, inspect your exterior annually and repaint or restain every five to seven years to keep moisture out.
How Do You Repair Fiber Cement Siding?
Fill minor fiber cement damage with cementitious patching compound, but replace cracked or broken planks using galvanized nails.
Fiber cement siding, often sold under the HardiePlank brand name, is durable and fire-resistant. But it is heavier and more rigid than vinyl, which makes repairs more physically demanding. The material also produces silica dust when cut, so always wear a respirator and eye protection.
DIY vs. Professional: At a Glance
Patching Minor Damage
Mix a fiber cement repair compound or cementitious filler according to the manufacturer’s directions. Apply with a putty knife, feathering the edges to blend with the surrounding surface. After the patch cures, sand smooth and paint with exterior paint rated for fiber cement.
Replacing a Fiber Cement Plank
This is a two-person job because of the weight of the planks. Use a flat bar to carefully lift the plank above the damaged one. Cut the nails holding the damaged plank with a mini hacksaw or oscillating tool. Slide the damaged plank out and inspect the weather barrier for damage.
Measure and cut the replacement plank. If you are using a circular saw, use a fiber cement blade and cut outdoors with the finished side facing down to minimize chipping. Slide the new plank into position, nail into studs with galvanized nails, caulk the seams, and paint all exposed edges and faces.
How Much Does Siding Repair Cost?
Most homeowners spend $350 to $1,500 for a 100-square-foot repair, with vinyl the cheapest and stone veneer the most expensive.
Repair costs depend on the siding material, the type and extent of damage, accessibility, and your local labor market. Small patches and caulk repairs can cost under $100 in materials if you do the work yourself, while larger jobs involving panel replacement and underlying moisture remediation can run several thousand dollars.
| Siding Material | Repair Cost per 100 sq. ft. | DIY Difficulty |
|---|---|---|
| Vinyl | $150 to $500 | Easy |
| Wood | $400 to $1,200 | Moderate |
| Fiber Cement | $500 to $1,500 | Moderate to Difficult |
| Aluminum | $300 to $900 | Moderate |
| Stucco | $600 to $1,800 | Difficult |
| Brick/Stone Veneer | $800 to $2,500+ | Professional recommended |
Labor rates for siding contractors generally fall between $40 and $90 per hour, though many quote flat rates for smaller jobs. If your repair requires scaffolding, the cost increases further.
Understanding the full cost to re-side a house can help you weigh whether spot repairs or a full replacement makes better financial sense.
Spring and summer are the busiest seasons for home improvement projects — top-rated contractors book up fast. Lock in your estimate now before demand peaks.
Check Availability in Your Area →Should You Repair Siding Yourself or Hire a Professional?
DIY works for small holes and single-panel swaps, but structural damage, mold, and multi-story repairs need a licensed contractor.
The decision comes down to three factors: the scope of the damage, the height of the repair, and whether there is hidden damage behind the panels.
When DIY Makes Sense
Small caulk fills, single vinyl panel swaps, and surface patches on wood siding are all reasonable DIY projects. If the damage is limited to one or two panels at ground level and the house wrap and sheathing behind them are in good condition, most homeowners can handle the work in an afternoon.
When to Call a Professional
Hire a contractor when:
- The damage spans more than a few panels or extends across multiple courses
- You find mold growth on or behind the siding
- The repair involves second-story work requiring ladders or scaffolding
- You suspect pest or termite damage behind the panels
- The sheathing, house wrap, or framing needs repair
- Your siding contains asbestos (common in homes built before 1980)
A professional inspection can also help you decide between a targeted repair and a more comprehensive approach. If your siding is nearing the end of its expected lifespan, investing in repairs may not make sense when understanding the trade-offs between repair and replacement points toward a full re-side.
Ready to Move Forward?
Tell us about your project and get matched with up to 3 pre-screened contractors. Compare quotes, check reviews, and hire with confidence.
How Can You Prevent Future Siding Damage?
Regular inspections, prompt caulking, proper gutter maintenance, and trimming vegetation away from walls prevent most siding failures.
Repairs are reactive. Prevention is what keeps repair costs low over the long run.
Seasonal Maintenance Checklist
Inspect your siding twice a year, ideally in spring and fall. Look for cracks, loose panels, peeling paint, and any gaps where water could enter. Recaulk around windows, doors, and utility penetrations whenever the existing sealant shows signs of cracking or pulling away.
Keep gutters clean and functional so water drains away from the walls rather than overflowing onto the siding. Faulty gutters are one of the most common causes of siding problems homeowners overlook.
Landscaping and Clearance
Trim tree branches so they do not contact the siding. Keep shrubs at least 12 inches from the wall to allow air circulation and reduce moisture buildup. Redirect lawn sprinklers so they do not spray directly onto the siding, as repeated wetting accelerates paint failure and rot on wood surfaces.
Choosing Durable Materials
If you are re-siding or building new, the material you choose affects how much maintenance you will need long-term. Each option carries different durability, cost, and aesthetic trade-offs. A comparison of different siding options can help you match material performance to your climate and budget.
Get the repair done right. Whether you are patching a small hole or replacing damaged panels, working with an experienced siding contractor ensures the job holds up season after season. Connect with trusted siding professionals in your area to get a free estimate today.

Anna has over six years of experience in the home services and journalism industries and serves as the Content Manager at MyHomePros.com, specializing in making complex home improvement topics like HVAC, roofing, and plumbing accessible to all. With a bachelor’s degree in journalism from Auburn University, she excels in crafting localized, comprehensive guides that cater to homeowners’ unique needs. Living on both coasts of the United States has equipped her with a distinctive perspective, fueling her passion for turning any house into a cherished home through informed, personalized decision-making.
Connect with top-rated local contractors who can help you with siding, roofing, HVAC, windows, and more. Get free quotes from verified professionals in your area today.