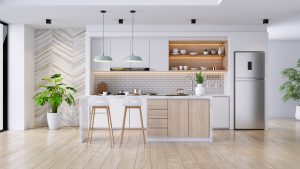
The difference between a kitchen that feels welcoming and one that feels like a utility room usually isn’t the cabinets, the countertops, or the appliances. It’s the lighting.
A well-planned lighting setup eliminates countertop shadows, makes food look appetizing, highlights the design details you’ve invested in, and lets you shift the room’s mood depending on the moment. A poorly planned one does the opposite, no matter how much you’ve spent on everything else.
This guide covers everything you need to plan kitchen lighting that works: the three essential layers, the right fixtures for each purpose, how to get brightness and color temperature right, layout strategy, and realistic costs.
Why Does Kitchen Lighting Matter?
Good kitchen lighting improves safety, supports daily tasks, and enhances the overall design of the most-used room in your home.
Safety and Visibility
Kitchens are where you work with knives, hot surfaces, and boiling water. Bright, focused lighting at every work surface helps prevent accidents and reduces eye strain during meal prep.
Shadows are the main culprit. When the only light source is a single ceiling fixture, your own body blocks the light and throws a shadow right where you need to see.
Multi-Purpose Functionality
Today’s kitchens serve as dining areas, home offices, and gathering spaces. That demands lighting that can shift from bright and functional during cooking to warm and relaxed during a dinner party.
Dimmable, layered lighting is the only way to support all of these uses in one room.
Design Impact
Your countertop material, cabinetry, and finishes look their best under thoughtful lighting. A single overhead fixture flattens the room and hides the textures and colors you invested in. Layered lighting brings those design elements to life.
If you’re planning a full renovation, consider lighting early in the process so your electrician can run wiring before the drywall goes up.
What Are the Three Layers of Kitchen Lighting?
Effective kitchen lighting combines three layers that work together: ambient for overall illumination, task for work surfaces, and accent for visual depth.
| Lighting Layer | Purpose | Recommended Level (IES) | Best Fixture Types |
|---|---|---|---|
| Ambient (General) | Even room-wide illumination | 30-40 footcandles | Recessed cans, flush-mounts |
| Task (Work Zones) | Focused light on counters, sink, stove | 50-100 footcandles | Under-cabinet LEDs, pendants |
| Accent (Decorative) | Visual interest and atmosphere | 10-20 footcandles | Toe-kick strips, in-cabinet pucks |
Footcandle recommendations based on Illuminating Engineering Society (IES) residential guidelines.
Ambient Lighting
This is the base layer that fills the room with general illumination. Recessed ceiling lights, flush-mount fixtures, and large pendants all serve this role.
Ambient lighting should feel even and comfortable. Bright enough to move through the kitchen safely, but not so harsh that it creates glare on reflective countertops.
Task Lighting
This is the focused, brighter illumination directed at countertops, the stovetop, and the sink. Without dedicated task lighting, overhead fixtures cast your body’s shadow onto the cutting board.
Under-cabinet LED strips, island pendants, and directional recessed fixtures are the most common task lighting solutions. This layer is the most important one for day-to-day functionality and safety.
Accent Lighting
Accent lighting adds personality. It highlights the inside of glass-front cabinets, creates a soft glow with toe-kick strips along the island base, or washes light across open shelving.
This layer is optional, but it’s the difference between a kitchen that looks “fine” and one that feels intentionally designed.
Key Principle: Each lighting layer should have its own switch and its own dimmer. This lets you run bright task lighting for cooking, then dial it back to accent-only for entertaining.
What Are the Most Popular Kitchen Lighting Fixtures?
The most popular kitchen lighting fixtures include recessed lights for ambient coverage, pendants for islands, under-cabinet LEDs for task lighting, and track lighting for flexible directional control.
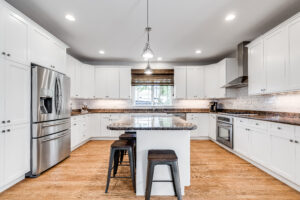
Recessed Lighting
Recessed lights (also called can lights or downlights) sit flush with the ceiling and distribute light evenly without taking up visual space.
Use 4-inch or 5-inch cans for focused task lighting over specific zones. Use 5-inch or 6-inch cans for broader ambient coverage across the general space.
Pendant Lighting
Pendants hang from the ceiling and provide both task illumination and a design focal point over islands.
For a standard 6- to 8-foot island, two to three pendants spaced evenly work well. The bottom of each fixture should hang 30 to 36 inches above the countertop. Adjust based on the primary users’ heights so the bottom rim sits just above eye level rather than blocking sightlines across the room.
If your island also serves as a seating area, our guide to kitchen island seating covers layout considerations that affect pendant placement.
Under-Cabinet Lighting
Under-cabinet fixtures mount beneath wall cabinets to illuminate countertops directly. LED strip lights, puck lights, and linear light bars are the three main options.
This is the single most impactful task lighting upgrade for most kitchens. For a detailed comparison of fixture types, see our guide to the best under-cabinet lighting options.
Track Lighting
Track lighting uses a mounted rail with adjustable light heads that can be repositioned and redirected. It comes in both contemporary and traditional styles that fit a range of kitchen designs.
Track systems are especially useful in older homes where adding recessed cans to a finished ceiling isn’t practical.
Renter Tip: If you rent and can’t modify wiring, look for plug-in track lighting systems. These mount with simple drywall anchors and plug into a standard wall outlet, with no electrician required.
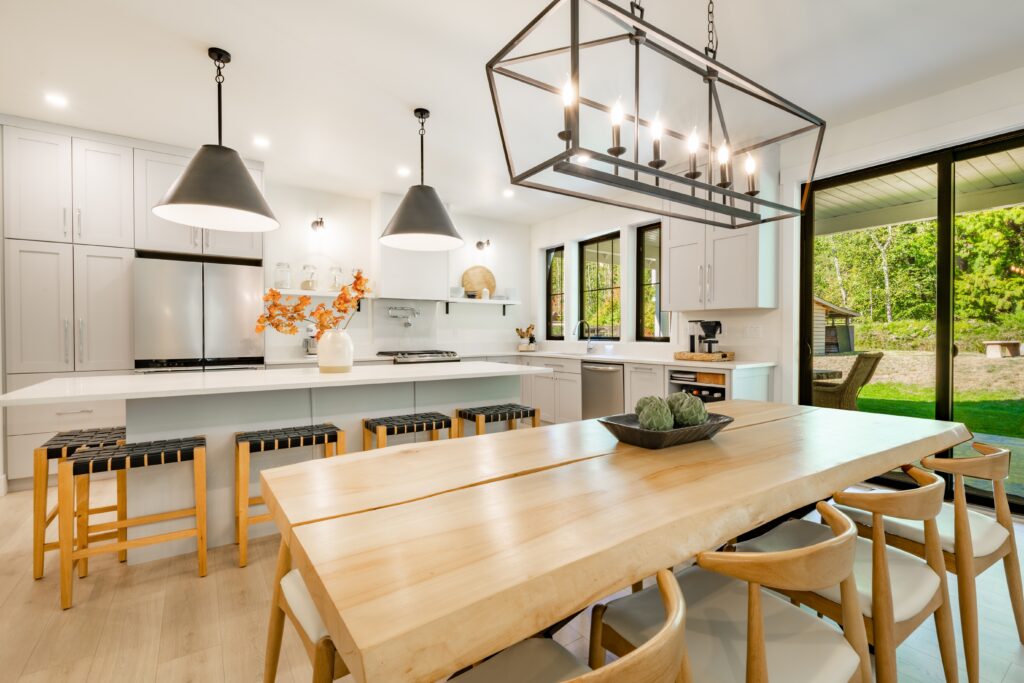
Chandeliers and Statement Fixtures
Chandeliers and decorative fixtures work well over kitchen tables, breakfast nooks, or large islands. They add personality that recessed or flush-mount lights can’t provide.
Keep in mind that large or heavy fixtures may need additional ceiling support, which adds to installation cost.
Flush-Mount and Semi-Flush Ceiling Lights
These are the budget-friendly workhorse for kitchens with standard-height or low ceilings where pendants aren’t practical. Basic flush-mount fixtures cost $25 to $100 and install easily on an existing junction box.
How Many Lumens Does a Kitchen Need?
A kitchen needs roughly 60 to 80 source lumens per square foot at the ceiling for ambient lighting to account for light loss between the fixture and the work surface.
Understanding Lumens vs. Footcandles
There’s an important distinction here that most lighting guides skip. Lumens measure how much light a bulb produces. Footcandles measure how much light actually reaches a surface.
Light weakens as it travels from the ceiling to the counter, and dark cabinets and countertops absorb additional output. So the lumens produced at the source are always higher than the footcandles that reach your workspace.
The Illuminating Engineering Society (IES) recommends:
- Ambient lighting: 30 to 40 footcandles at floor level
- Task lighting: 50 to 100 footcandles at the countertop
In practice, this means you should over-index on lumens at the ceiling and use dimmers to dial in the right level, rather than relying on a strict square-footage formula. In a typical kitchen, only about 50% to 60% of the light leaving a ceiling fixture reaches the countertop or floor, so source lumens at the fixture need to be roughly double the footcandle targets.
General Lumen Guidelines by Kitchen Size
| Kitchen Size | Source Lumens Needed (at ceiling) | Notes |
|---|---|---|
| Small (under 100 sq ft) | 6,000-8,000 | 4-6 recessed lights typical |
| Medium (100-200 sq ft) | 8,000-12,000 | 6-8 recessed lights typical |
| Large (over 200 sq ft) | 12,000-16,000+ | Consider multiple fixture types |
Kitchens with dark cabinetry, dark countertops, or limited natural light absorb more output. Plan for 10% to 20% more lumens than these baseline figures suggest, and always install dimmable fixtures so you can adjust down rather than wishing you had more light.
What Color Temperature Is Best for Kitchen Lighting?
The ideal color temperature for most kitchens is 3000K, which produces a warm white that balances task-friendly brightness with a comfortable, inviting feel.
Reading the Kelvin Scale
Color temperature is measured in Kelvins (K). Lower numbers produce a warmer, more golden glow. Higher numbers shift toward a cooler, bluish-white daylight tone.
- 2700K: Warm, yellowish. Cozy for living rooms but can make food look inaccurate.
- 3000K: Warm white. The standard recommendation for kitchen ambient and task lighting.
- 3500K-4000K: Neutral white. Brighter and more clinical. Occasionally used in task zones.
- 5000K+: Daylight blue. Best for commercial kitchens. Too harsh for most homes.
Why Consistency Matters
Lighting professionals strongly advise standardizing the Kelvin rating across all permanent fixtures in the kitchen, especially in open-concept layouts where the kitchen lighting is visible from adjacent rooms.
Mixing 2700K accent lights with 3500K task lights in the same space creates a visually fragmented look. Instead of installing mismatched bulbs, use dimmers or “dim-to-warm” LED technology, which shifts from cool-white at full brightness to warm amber when dimmed. This mimics the natural behavior of incandescent bulbs while keeping the color palette consistent.
Color Rendering Index (CRI)
Color Rendering Index (CRI) measures how accurately a light source reveals true colors compared to natural sunlight. Look for a CRI of 90 or higher.
This matters in kitchens because accurate color rendering helps you judge meat doneness, spot bruised produce, and see whether a sauce has thickened. ENERGY STAR recommends checking both Kelvin and CRI ratings when shopping for LED bulbs.
How Do You Plan a Kitchen Lighting Layout?
Start by identifying where you actually work in the kitchen, then place lights at those specific zones before filling in the rest of the room.
The Task-First Layout Strategy
Most guides suggest spacing recessed lights in an even grid across the ceiling. That approach sounds logical, but it ignores how kitchens actually work. Kitchens are defined by cabinets, appliances, and counters, not open floor space.
A better approach: place task lights exactly where you need them first, then add ambient fill.
Step 1: Map your work zones. Walk through your daily routine and mark every spot where you stand to work. The stove, the main prep counter, the sink, and the coffee station each need dedicated task lighting.
Step 2: Place task lighting. Install under-cabinet LEDs along every countertop run. Add a recessed can or pendant directly above the sink. Hang two to three pendants over the island. Add a motion-sensor LED strip inside the pantry.
Step 3: Add ambient fill. Now place recessed ambient lights to cover the remaining floor area. Position them about 24 inches from the wall (directly above the front edge of the countertop) so they wash light down onto the work surface at an angle rather than casting shadows from behind you.
Step 4: Layer in accent lighting. In-cabinet fixtures for glass-front doors, LED strips along open shelving, and toe-kick lights for nighttime navigation are all popular finishing touches.
Step 5: Plan your controls. Each lighting layer needs its own circuit and dimmer. At minimum, you want three independent zones: ambient, task, and accent.
Your kitchen layout influences this planning significantly. Open floor plans need more defined lighting zones because the kitchen lighting transitions visually into adjacent living spaces.
Important: LED-Compatible Dimmers Required. Do not use standard incandescent dimmers with LED fixtures. They cause flickering, buzzing, and premature bulb failure. Purchase dimmers labeled “LED-compatible,” “ELV,” or “CL-rated” to ensure smooth, quiet dimming performance.
How Do You Match Lighting to Your Kitchen Style?
Match lighting fixtures to your kitchen’s design by choosing shapes, finishes, and materials that reinforce the room’s existing aesthetic.
Modern and contemporary kitchens pair best with clean-lined recessed lighting, simple geometric pendants, and slim under-cabinet LED strips. Linear suspension lights over islands suit this style particularly well.
Traditional kitchens benefit from chandeliers with warm metallic finishes, lantern-style pendants, or glass-shade fixtures. Wall sconces near a breakfast nook or open shelving add warmth.
Farmhouse and transitional kitchens often mix styles, pairing industrial-inspired pendants over the island with clean recessed lighting elsewhere.
Regardless of style, stick to one or two complementary fixture finishes throughout the kitchen. Too many mixed metals (brushed nickel, oil-rubbed bronze, matte black) make the room look disjointed.
How Much Does Kitchen Lighting Cost to Install?
Most homeowners spend between $500 and $3,000 for a full kitchen lighting upgrade, though costs can climb above $5,000 for large kitchens with custom fixtures or new wiring.
Cost by Fixture Type
| Fixture Type | Fixture Cost | Installed Cost | Notes |
|---|---|---|---|
| Recessed lighting (per light) | $45-$100 | $125-$300 | $700-$1,650 for typical 6-light kitchen |
| Pendant lights (each) | $50-$250 | $100-$450 | 2-3 pendants typical for island |
| Under-cabinet zone (full kitchen) | $50-$300 (materials) | $500-$900 (hardwired) | Cost is per zone, not per fixture |
| Flush-mount ceiling light | $25-$100 | $100-$200 | Simple swap on existing box |
| Chandelier / statement fixture | $115-$1,400+ | $200-$1,600+ | Heavy fixtures need ceiling support |
| DIY plug-in LED strips | $15-$70 (kit) | $15-$70 | No electrician needed |
Electricians generally charge $50 to $120 per hour, and labor accounts for 40% to 60% of a kitchen lighting project’s total cost.
Installing in existing finished ceilings runs about 20% to 30% more than new construction work because the electrician has to navigate existing drywall and wiring.
For a broader renovation budget, our kitchen remodeling ideas on a budget guide covers additional cost-saving strategies.
Permits and Code Considerations
New lighting circuits may require Arc-Fault Circuit Interrupter (AFCI) breakers under the current National Electrical Code (NEC), and some jurisdictions require permits for new electrical work. Check with your local building department before starting.
If you’re unsure whether your project needs a permit, our guide on whether you need a permit for home remodeling breaks down the requirements by project type.
Should You Hire an Electrician or DIY?
Hire a licensed electrician for any work that involves new wiring, circuit additions, or hardwired fixtures. DIY is reasonable for plug-in LED strips, battery-operated puck lights, and simple one-for-one fixture swaps.
When to DIY
Plug-in under-cabinet LED strips are the easiest and most impactful DIY upgrade. A complete strip kit costs $15 to $70, installs in under an hour, and requires no electrical knowledge.
Swapping an existing light fixture for a new one on the same junction box is also straightforward if you’re comfortable turning off the breaker and connecting basic wires.
When to Hire a Pro
If the project requires cutting into ceilings, running new wires through walls, or adding circuits to your breaker panel, hire a licensed electrician.
Get at least three written estimates, verify licensing and insurance, and ask for references from recent kitchen projects. A good electrician will suggest bundling all your lighting work into a single visit, which costs significantly less than scheduling separate appointments.
Cost-Saving Tip: Hire an electrician to run wiring and install junction boxes, then handle the cosmetic fixture installation yourself. Many electricians will structure jobs this way at a lower labor rate.
What Are Energy-Efficient Kitchen Lighting Options?
LED fixtures are the most energy-efficient kitchen lighting option, using up to 75% less electricity than incandescent bulbs and lasting 25 to 50 times longer, according to the U.S. Department of Energy.
LED Bulbs
If your kitchen still has incandescent or halogen bulbs, switching to LED equivalents is the fastest way to cut lighting energy costs. A 10-watt LED produces the same brightness as a 60-watt incandescent, and a quality LED lasts roughly 25,000 to 50,000 hours.
Smart Lighting Systems
Wi-Fi or Bluetooth-enabled bulbs and switches let you control brightness, color temperature, and schedules through a smartphone app or voice assistant. This is especially useful in open-concept layouts where kitchen lighting affects the entire main living area.
Motion Sensors and Timers
Motion-activated LED strips are an underrated upgrade for pantries, under-cabinet zones, and toe-kick lighting. They turn on automatically when you approach and shut off when you leave. Zero wasted energy, zero fumbling for switches.
LED Retrofit Kits
If your kitchen already has functional recessed can housings with outdated bulbs, LED retrofit kits snap into the existing housing for just $5 to $40 per light. That’s a fraction of the cost of a full fixture replacement. For more ways to cut utility costs, see our home energy saving tips.
What Are Common Kitchen Lighting Mistakes?
The most common kitchen lighting mistake is relying on a single overhead fixture, which creates shadows on countertops and leaves corners dim.
Misplacing Recessed Lights
When recessed cans are positioned directly above where you stand at the counter (typically 36 inches from the wall), your body blocks the downlight and casts a shadow onto the work surface.
Place recessed task lights directly above the counter’s leading edge, roughly 24 inches from the wall. This washes light down onto the countertop from an angle instead of from behind you.
Skipping Under-Cabinet Lighting
No amount of overhead lighting compensates for the shadows that wall cabinets cast on countertops. Under-cabinet fixtures solve this directly and affordably.
Ignoring the Sink
The sink is where you wash produce, handle raw meat, and clean dishes. A dedicated recessed light or small pendant directly above the sink takes care of this blind spot.
Using Mismatched Color Temperatures
When one fixture produces warm yellow light and another emits cool white, the kitchen looks fragmented. Standardize at 3000K for all permanent fixtures and use dimmers or dim-to-warm LEDs to adjust the mood.
Installing Without Dimmers
Fixed-brightness lights limit how the space feels at different times of day. Dimmers are the cheapest way to add flexibility. Just make sure they’re LED-compatible.
Underestimating Total Light Output
It’s far better to install more fixtures on dimmers than to discover the kitchen feels too dark after the ceiling is patched. Adding recessed lights after construction costs significantly more than getting it right the first time.
For a broader look at planning missteps, our guide to kitchen remodel mistakes to avoid covers lighting alongside layout, storage, and budgeting pitfalls.
Frequently Asked Questions
What is the best lighting for a kitchen?
A layered approach combining ambient, task, and accent lighting on separate dimmers provides the most functional and attractive kitchen lighting for most homes.
How bright should kitchen lighting be?
The Illuminating Engineering Society recommends 30 to 40 footcandles for general kitchen illumination and 50 to 100 footcandles at task surfaces. To hit those targets after accounting for light loss, most kitchens need 6,000 to 16,000 total source lumens at the ceiling, depending on size and surface colors.
Are pendant lights enough for a kitchen island?
Pendants provide excellent task lighting over an island, but they should be part of a layered plan that includes ambient overhead lighting and under-cabinet task lighting elsewhere.
Is under-cabinet lighting worth it?
Under-cabinet lighting is one of the most cost-effective kitchen upgrades. It eliminates countertop shadows, improves prep visibility, and adds a design element that makes the space feel more polished.
What type of light bulb is best for a kitchen?
LED bulbs at 3000K with a CRI of 90 or higher are the best choice. They offer accurate color rendering, energy efficiency, and a 25,000-plus-hour lifespan.
How much does it cost to add recessed lighting to a kitchen?
A typical six-light installation costs $700 to $1,650, including fixtures and labor. Costs run 20% to 30% higher when working with finished ceilings versus new construction.
The Bottom Line
Kitchen lighting comes down to three decisions: what types of light to use, where to put them, and how to control them.
For the types, you need all three layers. Ambient lighting for general visibility, task lighting at every work surface, and accent lighting if you want the space to feel finished rather than just functional.
For placement, think task-first. Light the counter edges, the sink, the stove, and the island before worrying about filling the middle of the ceiling. Under-cabinet LEDs are the single highest-impact upgrade for most kitchens, and a plug-in strip kit for $15 to $70 is the easiest place to start.
For control, put every layer on its own LED-compatible dimmer. The ability to shift from full brightness during meal prep to a low glow during dinner is what makes a lighting plan feel complete.
If you’re budgeting a larger project, start with our complete guide to kitchen remodeling to see how lighting fits into the bigger picture.

Anna has over six years of experience in the home services and journalism industries and serves as the Content Manager at MyHomePros.com, specializing in making complex home improvement topics like HVAC, roofing, and plumbing accessible to all. With a bachelor’s degree in journalism from Auburn University, she excels in crafting localized, comprehensive guides that cater to homeowners’ unique needs. Living on both coasts of the United States has equipped her with a distinctive perspective, fueling her passion for turning any house into a cherished home through informed, personalized decision-making.
Connect with top-rated local contractors who can help you with siding, roofing, HVAC, windows, and more. Get free quotes from verified professionals in your area today.