

If your flat roof is leaking and you need a reliable fix that won’t drain your savings, torch down roofing deserves a serious look. This modified bitumen system uses heat-welded asphalt membranes to create a watertight barrier, and it remains one of the most trusted options for low-slope and flat roofs across the country. Most homeowners pay between $3.50 and $7.00 per square foot installed, with total project costs landing between $4,400 and $15,000 depending on roof size and complexity.
But cost is only part of the picture. Torch down roofing involves open-flame installation, specific material choices between APP and SBS membranes, and maintenance considerations that separate it from single-ply alternatives like TPO or EPDM. This guide breaks down everything you need to know before committing to a modified bitumen roof.
What Is Torch Down Roofing?
Torch down roofing is a modified bitumen membrane system designed for flat and low-slope roofs with pitches between 0.25:12 and 3:12.
Modified bitumen was developed in Europe during the 1960s as an evolution of traditional built-up roofing (BUR). It arrived in the United States by the mid-1970s and quickly gained traction because it combined the proven waterproofing performance of asphalt with the added flexibility of polymer modifiers. The result is a rolled membrane that bonds to the roof deck through heat application, creating a continuous, sealed surface.
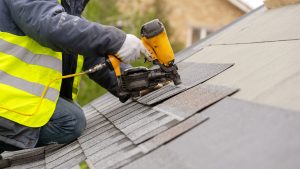
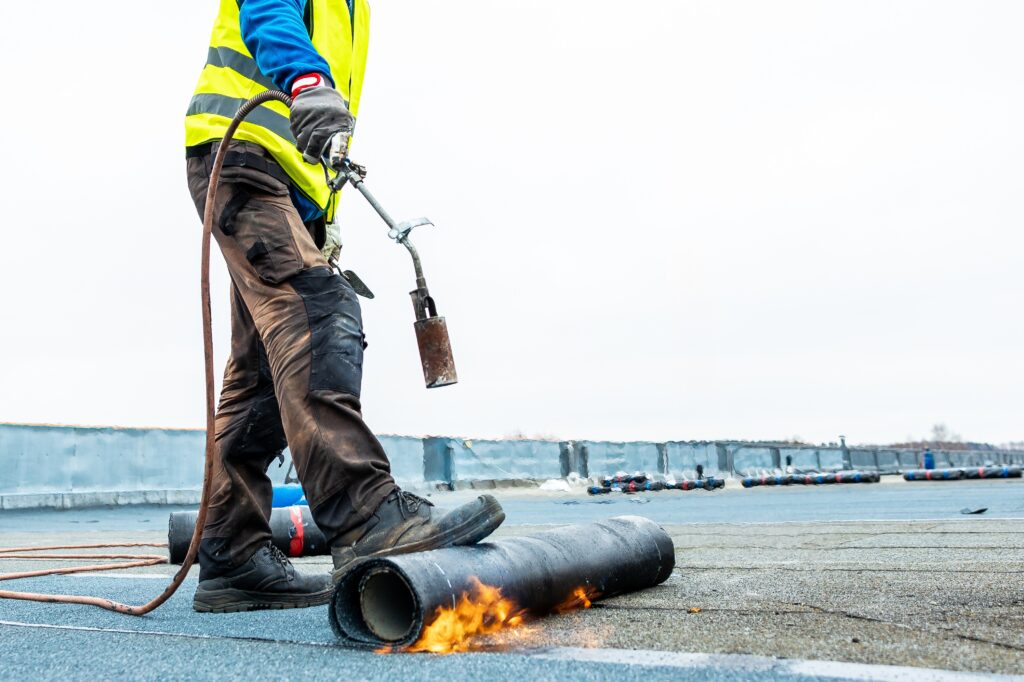
The “torch down” name comes from the installation method. A roofing professional uses a propane torch to heat the underside of the membrane as it unrolls across the roof. The heat melts the asphalt layer, fusing it to the substrate below and welding overlapping seams together. This produces a monolithic waterproof barrier with no exposed fasteners or adhesive gaps.
Most torch down systems use a multi-layer approach. A base sheet gets mechanically fastened or adhered to the roof decking, followed by one or two cap sheets that provide the final weatherproof surface. The cap sheet typically features mineral granules on top for UV protection and added durability.
How Much Does Torch Down Roofing Cost?
Torch down roofing costs between $3.50 and $7.00 per square foot installed, with most homeowners spending $4,400 to $15,000 total.
Materials account for roughly 40% of the total project cost, while labor makes up the remaining 60%. Torch down membrane rolls typically run between $100 and $200 per roll for materials alone, with each roll covering approximately 100 square feet. Installed costs per roll range from $350 to $700.
| Roof Size (sq. ft.) | Estimated Total Cost |
|---|---|
| 1,000 | $3,500 – $7,000 |
| 1,500 | $5,250 – $10,500 |
| 2,000 | $7,000 – $14,000 |
| 2,500 | $8,750 – $17,500 |
| 3,000 | $10,500 – $21,000 |
If you are measuring your roof for the first time, keep in mind that a roofing square equals 100 square feet. A 2,000 square foot flat roof requires 20 squares of material, which makes it easy to multiply the per-square cost ($350 to $700) by the number of squares needed.
Cost Tip: Because flat roofs closely match the footprint of your home, you can estimate your roof size by multiplying the length and width of your house. This gives you a rough starting point before getting a professional measurement.
What Affects the Cost of Torch Down Roofing?
Several variables push torch down roofing costs higher or lower, from the number of membrane layers to regional labor rates.
Number of Layers
A two-layer system (one base sheet, one cap sheet) is the standard minimum. Adding a third interply sheet increases both material and labor costs by roughly 25% to 35%, but it also adds significant waterproofing redundancy. Three-ply systems are common in regions with heavy rainfall or extreme temperature swings.
Actual costs depend on your location, project scope, and materials. The best way to know what you'll pay is to get quotes from local contractors.
Get Your Free Estimate →Roof Complexity
Simple rectangular flat roofs cost the least to cover. Roofs with multiple penetrations for HVAC units, skylights, plumbing vents, or parapet walls require additional flashing work and custom membrane cuts. Each penetration adds time and material, which increases the final bill.
Perimeter Linear Footage vs. Square Footage
While total square footage dictates the bulk of your material order, the perimeter shape of your flat roof can dramatically swing labor costs. Flat roofs surrounded by parapet walls (the short protective walls extending above the roofline) require extensive vertical flashing and detail work. Terminating a torch down membrane up and over a wall takes three times longer than letting it drop cleanly into an open gutter. If your roof has a high ratio of linear perimeter walls relative to its total square footage, expect labor estimates to lean toward the higher end of the pricing spectrum.
Tear-Off and Disposal
If your existing roof needs to be removed before installation, expect to add $1.00 to $2.50 per square foot for tear-off and disposal. Some local codes limit the number of roofing layers that can be stacked, so removal may not be optional. Your contractor should inspect the existing layers and advise whether an overlay is permitted.
"We matched with a great contractor the same day. The whole process was easy and completely free."
Decking Repairs
Damaged or rotted roof decking must be replaced before new membrane goes down. Plywood decking replacement typically costs $4 to $8 per square foot, and the scope of repairs is often unknown until the old roofing is removed.
Geographic Location
Labor rates and material availability vary significantly by region. Urban areas and states with higher costs of living generally charge more for roofing labor. Climate also plays a role, because regions with harsh winters or extreme heat may require upgraded materials or additional insulation layers.
What Are the Types of Modified Bitumen Roofing?
Modified bitumen membranes fall into two categories, APP and SBS, each using a different polymer to modify the base asphalt.
APP (Atactic Polypropylene)
APP membranes blend asphalt with plastic polymers, creating a material that performs well in high heat and direct UV exposure. This is the classic torch-applied membrane. APP sheets have a higher melting point than SBS, which means they are more tolerant of sun exposure without softening. They are also naturally UV-resistant, so they tend to age well on roofs that receive all-day sun.
The trade-off is flexibility. APP membranes are stiffer than SBS, which makes them less forgiving in cold climates where thermal contraction can stress the material. Installation requires careful temperature control with the torch to ensure proper adhesion without overheating.
SBS (Styrene-Butadiene-Styrene)
SBS membranes use a rubber-based modifier that makes the finished product more elastic and flexible. This extra give helps the membrane absorb building movement, thermal expansion, and minor impacts without cracking. SBS is the preferred choice for colder climates where freeze-thaw cycles are a concern.
While SBS membranes can be torch-applied, they are also available in self-adhering and cold-adhesive versions. This versatility gives contractors more installation options and can reduce the fire risk associated with open-flame torching.
| Feature | APP | SBS |
|---|---|---|
| Polymer Type | Plastic (polypropylene) | Rubber (styrene-butadiene) |
| UV Resistance | High | Moderate (needs coating or granules) |
| Flexibility | Lower | Higher |
| Best Climate | Hot, sunny | Cold, variable |
| Primary Install Method | Torch-applied | Torch, cold-adhesive, or self-adhered |
The Modern Shift: Self-Adhered and Cold-Applied Alternatives
Because traditional torch-down installation introduces an open flame to residential structures, the industry has seen a massive expansion in Self-Adhered (SA) modified bitumen, often colloquially called “peel-and-stick.”
SA systems use an advanced pressure-sensitive adhesive backing on the SBS membrane that bonds directly to a matching base sheet without external heat. Alternatively, cold-applied systems use a liquid asphalt adhesive rolled out like paint to fuse the layers. If you live in a dense urban historic district or an area where local building departments heavily restrict or ban open-flame roofing methods, these alternative application methods allow you to keep the durable properties of modified bitumen without the fire risk.
Why Hire a Licensed Professional
- Licensed & insured — protects you from liability
- Warranty coverage — manufacturers require pro installation
- Code compliance — avoids permit issues
- Faster completion — pros finish in days, not weeks
How Is Torch Down Roofing Installed?
Professional installation follows a layered sequence of insulation, base sheets, and torch-welded cap membranes built from the deck up.
The process begins with surface preparation. The existing roof surface is cleaned of all debris, and any old roofing material is either removed or evaluated for overlay compatibility. The roof deck gets inspected for damage, and any soft spots or rot are repaired before new material goes down.
Insulation and Base Layer
A rigid insulation board is often installed first, fastened to the deck with screws and plates. This layer improves energy efficiency and provides a smooth substrate for the membrane. On top of the insulation, a base sheet (fiberglass or polyester-reinforced) is mechanically fastened or adhered to create a stable foundation.
Membrane Application
The torch down membrane is positioned at the starting edge of the roof. The installer uses a propane torch to heat the underside of the roll while slowly unrolling it across the surface. The melted asphalt bonds to the base layer below as the roll advances. Adjacent rolls overlap by 3 to 4 inches at the seams, and the torch welds these overlaps into a continuous seal.
DIY vs. Professional: At a Glance
The Critical Window: Avoiding the “Trapped Moisture” Phenomenon
One of the most critical aspects of torch-down installation is timing and environmental control. Experienced roofing crews know they cannot torch a roof if there is any morning dew or residual moisture on the substrate.
If a crew rushes the application early in the day while microscopic moisture is trapped beneath the membrane, a ticking clock begins. As soon as the afternoon sun heats the dark roof, that trapped water vaporizes, expands rapidly, and forces the hot asphalt layers upward. This creates immediate structural blisters that break the membrane’s bond and permanently compromise the roof’s lifespan before it’s even a year old.
Flashing and Finishing
After the field membrane is installed, the crew addresses penetrations and edges. Metal or membrane flashing is applied around pipes, HVAC equipment, and parapet walls. The cap sheet’s granule surface provides the final weather-resistant layer, though some installations add a reflective coating for additional UV protection.
Safety Note: Torch down installation involves open flames and extreme heat. This is not a DIY project. Always hire a licensed roofing professional with specific modified bitumen experience. The National Roofing Contractors Association (NRCA) offers a dedicated PROCertified Modified Bitumen Systems Installer credential, which is a good benchmark to verify when vetting contractors.
What Are the Pros and Cons of Torch Down Roofing?
Torch down roofing delivers strong waterproofing at low cost, but its shorter lifespan and impact vulnerability are notable drawbacks.
Spring and summer are the busiest seasons for home improvement projects — top-rated contractors book up fast. Lock in your estimate now before demand peaks.
Check Availability in Your Area →Advantages
Strong Waterproof Seal
The heat-welded seams create a continuous barrier with no gaps, fastener holes, or adhesive failures. This makes torch down one of the most leak-resistant flat roofing options available, especially in multi-layer configurations.
Cost-Effective for Flat Roofs
Compared to standing seam metal roofing ($10 to $17 per square foot) or PVC membranes ($6 to $12 per square foot), torch down offers solid performance at a lower price point. For homeowners working within a tighter budget, it delivers reliable protection at $3.50 to $7.00 per square foot.
Low Maintenance Requirements
Once installed, torch down roofing requires minimal upkeep. Annual inspections, debris removal, and occasional resealing of flashing are usually sufficient to maintain performance. This compares favorably to other roofing types that demand more frequent attention.
Fire Resistance
Modified bitumen has inherent fire-resistant properties. Many torch down products carry Class A fire ratings under ASTM E108/UL 790 testing standards, the highest classification available for roofing materials. This is particularly relevant for commercial buildings and homes in wildfire-prone areas.
Disadvantages
Shorter Lifespan
Torch down roofing typically lasts 12 to 20 years, depending on climate, material quality, and maintenance. This is notably shorter than TPO (20 to 30 years) or metal roofing (40 to 70 years). Homeowners planning to stay in their homes long-term should factor in the cost of eventual replacement.
Vulnerability to Impact Damage
While the membrane handles water, UV, and temperature fluctuations well, it is more susceptible to punctures from falling branches, foot traffic, and hail. A single puncture can compromise the waterproof barrier and lead to leaks if not repaired promptly.
Limited Slope Range
Torch down works best on roofs with a pitch between 0.25:12 and 3:12. It is not suitable for steeply pitched roofs. On perfectly flat surfaces with no slope at all, ponding water can overwhelm the membrane over time, making proper flat roof drainage essential.
Fire Risk During Installation
The open-flame torch method carries inherent risk. Improperly trained crews can ignite underlying materials, especially on older roofs with dry wood decking. This risk is one reason many building departments require permits and licensed installers for torch-applied roofing.
The Hidden Hurdle: The Contractor Liability and Insurance Bottleneck
Beyond the physical cons of the material, torch-down roofing presents a unique administrative hurdle for property owners: insurance exclusions.
Because open torches carry an inherent fire risk, standard residential roofing general liability policies frequently exclude “open-flame operations.” To legally and safely install torch-down roofing, a contractor must carry a highly specialized, incredibly expensive commercial insurance rider. Many standard residential roofers steer homeowners toward alternative materials simply because they cannot afford the premium for this rider. When vetting contractors, you must explicitly ask for verification that their policy actively covers open-flame/torch application—not just general roofing operations.
Ready to Move Forward?
Tell us about your project and get matched with up to 3 pre-screened contractors. Compare quotes, check reviews, and hire with confidence.
How Long Does Torch Down Roofing Last?
A properly installed torch down roof lasts between 12 and 20 years, with lifespan varying based on climate, material quality, and maintenance habits.
APP membranes generally perform better in hot climates because of their UV resistance, often reaching the 20-year mark with minimal degradation. SBS membranes hold up better in cold and variable climates but may need a reflective roof coating to extend their UV tolerance.
Routine maintenance makes a measurable difference. Clearing debris after storms, inspecting seams annually, and addressing small repairs before they grow can push a torch down roof toward the upper end of its expected lifespan. Neglected roofs in harsh climates can fail in under 12 years.
| Factor | Impact on Lifespan |
|---|---|
| Regular inspections and repairs | Extends lifespan by 3–5 years |
| Reflective coating application | Reduces UV degradation, adds 2–4 years |
| Ponding water (poor drainage) | Accelerates wear, shortens lifespan |
| Heavy foot traffic | Increases puncture risk |
| Extreme temperature swings | Stresses seams and membrane |
How Does Torch Down Compare to Other Flat Roofing Materials?
Torch down is one of several flat roofing options, and choosing between them depends on budget, climate, and how long you plan to keep the roof.
TPO roofing is one of the most common alternatives. It uses a single-ply thermoplastic membrane that is heat-welded at the seams and offers strong energy efficiency thanks to its reflective white surface. TPO typically costs $5 to $10 per square foot installed and lasts 20 to 30 years, making it a strong competitor for homeowners willing to spend more upfront.
EPDM (ethylene propylene diene monomer) is a synthetic rubber membrane known for its flexibility and ease of repair. It costs roughly $4 to $8 per square foot installed and lasts 20 to 25 years. EPDM is popular in colder climates because of its elastic properties, but its seams are adhesive-bonded rather than heat-welded, which can be a weak point over time.
Built-up roofing (BUR) is the traditional multi-layer asphalt system that torch down evolved from. BUR uses alternating layers of asphalt-soaked felt topped with gravel, creating a very heavy but durable roof. It costs $4 to $9 per square foot and can last 20 to 30 years, but its weight can be a concern for older structures.
| Material | Cost (per sq. ft.) | Lifespan | Best For |
|---|---|---|---|
| Torch Down | $3.50 – $7.00 | 12–20 years | Budget-friendly flat roofs |
| TPO | $5.00 – $10.00 | 20–30 years | Energy efficiency, commercial |
| EPDM | $4.00 – $8.00 | 20–25 years | Cold climates, easy repairs |
| BUR | $4.00 – $9.00 | 20–30 years | Heavy-duty commercial |
For a broader look at how different materials stack up, the complete guide to roofing types covers pitched and flat options side by side.
When Should You Replace Torch Down Roofing?
Most torch down roofs show clear warning signs before a full failure, and catching them early can save thousands in water damage repairs.
Blistering or bubbling in the membrane surface is one of the first indicators that the asphalt layers are separating. Small blisters can sometimes be repaired, but widespread bubbling usually signals that the roof is approaching the end of its service life. Cracking along seams or in the field of the membrane is another red flag, especially in colder climates where freeze-thaw cycles stress the material.
Persistent leaks that return after patching suggest the membrane has lost its integrity. If you are dealing with recurring roof leaks and the roof is more than 15 years old, replacement is typically more cost-effective than continued repairs.
Ponding water that sits for more than 48 hours after rainfall accelerates membrane deterioration and adds structural load to the roof deck. If your flat roof has persistent ponding issues, addressing drainage should be part of any replacement plan.
Before committing to a new roof, request multiple roofing estimates and ask each contractor about their experience with modified bitumen specifically. Not every roofer has torch application training, and this is one system where installer skill directly affects long-term performance.
The Bottom Line
Torch down roofing remains a proven, budget-friendly solution for flat and low-slope roofs that need reliable waterproofing.
The system works best for homeowners who need a dependable flat roof on a moderate budget and are comfortable with a 12 to 20 year replacement cycle. If your priorities lean toward maximum lifespan or energy efficiency, TPO or metal roofing may justify the higher upfront investment. But for proven waterproofing performance at a competitive price, modified bitumen has earned its place in the roofing market.
Whichever direction you go, asking the right questions during the contractor selection process will have a bigger impact on your results than any material choice alone. A skilled installer working with quality materials and proper specialty liability insurance is the foundation of every flat roof that performs as expected.
Get matched with top-rated roofing contractors in your area. Request free estimates from qualified professionals who specialize in flat roof installation.
Connect with top-rated local contractors who can help you with siding, roofing, HVAC, windows, and more. Get free quotes from verified professionals in your area today.