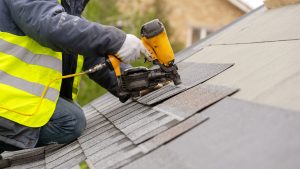
Grabbing a roofing nailer off the truck to start a siding job seems like a reasonable shortcut. Both tools are coil nailers, both fire fasteners into exterior materials, and they look nearly identical sitting on a shelf. But a closer look at nail length, shank design, and magazine specifications reveals that swapping one for the other is rarely that simple.
The answer depends entirely on the type of siding you are installing. Vinyl siding manufacturers often specify galvanized roofing nails as an acceptable fastener, which means a roofing nailer can work in that specific scenario. Fiber cement, wood lap, and engineered wood siding each have their own fastener requirements that change the equation.
What Are the Key Differences Between Roofing Nailers and Siding Nailers?
Roofing nailers and siding nailers use different nail lengths, head sizes, and magazine configurations optimized for distinct materials.
Both tools are pneumatic coil nailers, but their internal mechanisms are calibrated for different fasteners. A roofing nailer fires short nails with large heads. A siding nailer drives longer nails with smaller heads and ring shanks. Trying to load siding-specific coil nails into a roofing nailer will cause jams, misfires, or damage to the tool. While traditional air compressors rule the job site, modern battery-powered cordless roofing nailers (such as the Milwaukee M18 FUEL or Metabo HPT 18V) have become industry standards, operating under the same driving-force dynamics as their pneumatic counterparts.
| Feature | Roofing Nailer | Siding Nailer |
|---|---|---|
| Nail Length | 7/8″ to 1-3/4″ | 1-1/4″ to 2-1/2″ |
| Head Diameter | 3/8″ to 7/16″ | Approximately 1/4″ |
| Shank Type | Smooth | Ring shank or screw shank |
| Coil Capacity | 120 nails (typical) | 200 to 300 nails |
| Driving Force | Lower energy | Higher energy |
| Nail Removal | Designed for easy removal | Designed for permanent hold |
The driving force difference matters more than most people realize. Siding nailers deliver more energy per shot because they need to push longer nails through thicker cladding materials and into framing. A roofing nailer operating at the same air pressure will struggle to seat a 2-inch nail through fiber cement or engineered wood. Running a siding nailer on roofing shingles creates the opposite problem, where excessive force drives the nail head straight through the shingle mat.
What Type of Nails Does Vinyl Siding Require?
Most vinyl siding manufacturers specify corrosion-resistant roofing nails with a minimum 5/16-inch head and 3/4-inch sheathing penetration.
This is where the roofing nailer question gets interesting. Unlike wood or fiber cement siding, vinyl is not nailed tight to the wall. It is hung loosely on fasteners so panels can slide back and forth as temperatures change. The vinyl siding installation process requires a 1/32-inch gap between the nail head and the siding’s nail hem. Nailing too tight causes buckling and cracking as the panels expand in summer heat.
Because vinyl panels are thin and lightweight, they do not need the long ring-shank nails that heavier siding materials demand. Major manufacturers like CertainTeed specify 1-1/2-inch galvanized roofing nails as the standard fastener. ABTCO’s installation guidelines call for “electro or hot-dipped galvanized steel or aluminum roofing type nails” with a 1/8-inch shank diameter and a 3/8-inch head.
Actual costs depend on your location, project scope, and materials. The best way to know what you'll pay is to get quotes from local contractors.
Get Your Free Estimate →Recommended Nail Specs for Vinyl Siding
- Minimum length: 1-1/2 inches (longer if installing over foam insulation board)
- Head diameter: 5/16 inch minimum
- Shank diameter: 1/8 inch minimum
- Material: Hot-dipped galvanized steel, stainless steel, or aluminum
- Penetration depth: At least 3/4 inch into wood sheathing or 1-1/4 inches into nailable framing
Since vinyl siding manufacturers explicitly recommend roofing-type nails, a coil roofing nailer loaded with the correct galvanized roofing nails can be a legitimate tool for vinyl siding installation. Many professional siding contractors use roofing nailers on vinyl jobs, though a dedicated siding nailer with a vinyl siding adapter kit provides better nail placement control. The Vinyl Siding Institute’s installation manual provides additional fastening guidelines worth reviewing before starting any vinyl project.
Quality Control: The Field “Rattle Test”
When using an adapted roofing nailer on vinyl, installers must perform a quick physical diagnostic to ensure proper fastening. After firing a sequence of 3 to 4 nails, grab the vinyl panel and physically slide it left and right. It should move freely and “rattle” slightly within the slots. If the panel is pinned tight and refuses to budge, your roofing nailer’s depth-of-drive is set too deep, which will inevitably lock the panel down and cause mid-summer buckling.
"We matched with a great contractor the same day. The whole process was easy and completely free."
Can You Use a Roofing Nailer on Fiber Cement Siding?
Fiber cement siding accepts roofing nails for blind nailing, but face nailing requires longer nails that exceed most roofing nailer capacities.
Fiber cement products like James Hardie HardiePlank have become one of the most popular siding choices due to their durability and resistance to rot, fire, and insects. The manufacturer’s installation guide specifies two approved nailing methods, and each one calls for a different fastener.
Blind Nailing (Roofing Nailer Compatible)
Blind nailing hides the fastener under the overlapping course of siding above. For this method, James Hardie specifies a minimum 1-1/4-inch hot-dipped galvanized roofing nail driven into framing members. A roofing nailer loaded with 1-1/4-inch to 1-3/4-inch coil roofing nails can handle this application. The nail’s large head provides holding surface, and the overlapping siding panel above conceals it.
While standard asphalt shingles are typically fastened at 90 to 110 PSI, blind-nailing fiber cement with a roofing gun requires dropping your compressor regulator down to a 75 to 85 PSI sweet spot. Always run a 5-nail test on a scrap piece of OSB and fiber cement before working on the actual wall assembly to guarantee a clean, flush-mount profile without over-driving.
Face Nailing (Roofing Nailer Not Recommended)
Face nailing drives the fastener through the visible surface of the siding panel. This method requires a corrosion-resistant nail (typically stainless steel or HDG) at least 1-1/2 inches long with adequate holding power to resist the weight of fiber cement. The nail head remains visible, so a smaller-headed siding nail is preferred for aesthetics. Face nailing also demands precise depth control to avoid cracking the cement board. A siding nailer’s depth-of-drive adjustment handles this better than most roofing nailers.
Important: Fiber cement siding is brittle. Over-driving a nail creates a crater around the fastener that collects water and accelerates deterioration. If you use a roofing nailer for blind nailing on fiber cement, reduce air pressure and test on scrap material before working on the actual installation.
What Happens If You Use the Wrong Nails on Siding?
Using incorrect fasteners on siding leads to panel failure, water damage, voided warranties, and costly repairs within the first few years.
The consequences of using the wrong nails are not hypothetical. Siding problems tied to fastener mistakes show up as warping, buckling, loose panels, and moisture intrusion. Here is what goes wrong with each common mistake.
Why Hire a Licensed Professional
- Licensed & insured — protects you from liability
- Warranty coverage — manufacturers require pro installation
- Code compliance — avoids permit issues
- Faster completion — pros finish in days, not weeks
Nails Too Short
Roofing nails max out at 1-3/4 inches. If your wall assembly includes foam insulation board (typically 1/2 inch to 1 inch thick) plus sheathing (1/2 inch), a 1-3/4-inch nail may not reach the framing behind the sheathing. The nail sits in the foam or barely catches the OSB, and the first windstorm pulls the siding off the house.
The Continuous Insulation (CI) Foam Blindspot
If a home design features modern 1-inch continuous exterior foam insulation (CI) sheathing, a roofing nailer is completely disqualified across all siding types. Subtracting 1 inch of foam and 1/2 inch of sheathing/cladding from a maximum 1-3/4-inch roofing nail leaves a mere 1/4 inch of framing penetration. This completely fails the universal 3/4-inch minimum embedment required by building codes, creating a severe structural liability.
DIY vs. Professional: At a Glance
Smooth Shank Instead of Ring Shank
Roofing nails have smooth shanks designed for easy removal during re-roofing. Wood and engineered wood siding need ring-shank or screw-shank nails that grip the framing permanently. A smooth-shank roofing nail in wood siding will gradually back out as the material expands and contracts through seasonal temperature changes.
Nails Driven Too Tight
Roofing nailers are calibrated to set nails flush against the material. Vinyl siding needs a gap between the nail head and the panel. Using a roofing nailer without adjusting for this gap will pin the vinyl in place and create visible buckling across the entire wall when temperatures rise.
Spring and summer are the busiest seasons for home improvement projects — top-rated contractors book up fast. Lock in your estimate now before demand peaks.
Check Availability in Your Area →Voided Manufacturer Warranty
Most siding manufacturers specify exact fastener requirements in their installation manuals. Using non-approved nails gives the manufacturer grounds to deny warranty claims. On a $6,000 to $15,000 siding investment, saving $300 by skipping the right nailer is a bad trade. You can review typical siding costs and estimates to understand what is at stake.
Which Nailer Should You Use for Each Siding Type?
The correct nailer depends on the siding material, with vinyl being the most forgiving and wood lap siding requiring the most specific tool.
No single nailer works for every siding material. The table below matches each common siding type to the appropriate tool and fastener.
| Siding Material | Recommended Nailer | Nail Type | Typical Nail Length |
|---|---|---|---|
| Vinyl siding | Siding nailer or roofing nailer | Galvanized roofing nails | 1-1/2″ to 2″ |
| Fiber cement (blind nail) | Roofing nailer | HDG roofing nails | 1-1/4″ to 1-3/4″ |
| Fiber cement (face nail) | Siding nailer | HDG or stainless coil nails | 1-1/2″ to 2-1/4″ |
| Wood lap siding | Siding nailer | Ring-shank siding nails | 2″ to 2-1/2″ |
| Engineered wood (LP SmartSide) | Siding nailer | Ring-shank HDG nails | 2″ to 2-1/2″ |
| Cedar shakes | Siding nailer or roofing nailer | Stainless ring-shank nails | 1-3/4″ to 2″ |
Wood lap siding and engineered wood products demand longer ring-shank nails that simply will not fit in a roofing nailer’s magazine. The magazine geometry is wrong, the coil count is wrong, and the driving force falls short. A dedicated siding nailer is the only correct tool for these materials.
Cedar shake and shingle siding occupies a middle ground. Shake nails are closer to roofing nail specs in length (1-3/4 to 2 inches), but they typically need a ring shank or annular shank for permanent hold. Some roofing nailers can fire these nails if the diameter and coil configuration match. Always verify compatibility with the nailer manufacturer before loading non-standard nails.
Ready to Move Forward?
Tell us about your project and get matched with up to 3 pre-screened contractors. Compare quotes, check reviews, and hire with confidence.
When Is It Actually Safe to Use a Roofing Nailer for Siding?
A roofing nailer is a legitimate siding tool only when the siding manufacturer’s nail specs match what the roofing nailer can fire.
The safest approach is to start with the siding manufacturer’s installation guide, not the nailer sitting in the garage. If the installation manual calls for 1-1/2-inch galvanized roofing nails driven through nail slots, a roofing nailer is an appropriate choice. This scenario most commonly applies to vinyl siding and blind-nailed fiber cement.
Before Using a Roofing Nailer on Siding
- Read the siding manufacturer’s fastener specifications. Confirm that the recommended nail type, length, and head size fall within the roofing nailer’s range.
- Measure your wall assembly thickness. Add up the siding, sheathing, foam board (if any), and house wrap. Make sure the nail length provides the required penetration depth into framing or sheathing.
- Test depth of drive on scrap material. Adjust air pressure until the nail seats at the correct depth. For vinyl, leave 1/32 inch of clearance. For fiber cement, do not over-drive.
- Verify nail coating and corrosion resistance. Exterior nails must be hot-dipped galvanized, electro-galvanized, or stainless steel. Bright (uncoated) roofing nails will rust and stain the siding within a year.
- Check your warranty terms. Confirm that the siding warranty remains valid when using roofing-type fasteners applied with a roofing nailer.
Pro Tip: Some roofing nailer manufacturers sell vinyl siding adapter kits that add a guide for centering nails in the panel’s slot. Workhorse models like the MAX CN445R3 and Metabo HPT NV45AB2—including their modern battery-powered cordless counterparts—offer these attachments. If you already own a compatible tool, a $30 to $50 adapter kit turns it into a highly functional siding tool for vinyl applications. The Ambient Temperature Factor: If you are running an adapted roofing gun in cold weather (below 40°F), vinyl components become fragile. Standard plastic adapter tips can easily crack or fracture the freezing vinyl hem upon impact. In low temperatures, shift to specialized cold-weather composite adapters or aftermarket TPU-printed flexible tips to protect the material.
The Bottom Line
Choosing the correct nailer and fastener combination protects your siding investment, preserves warranties, and prevents exterior damage.
A siding installation is one of the largest exterior investments a homeowner makes. The lifespan of vinyl siding can stretch 20 to 40 years when installed correctly. Metal and aluminum siding lasts even longer. But those lifespans assume proper fastening from day one.
A roofing nailer can work for vinyl siding and blind-nailed fiber cement, but it is the wrong tool for wood lap, engineered wood, and face-nailed fiber cement. The shortcut of using whatever nailer is already on the truck leads to callbacks, warranty denials, and premature siding repair and patching that costs far more than renting the right tool for the job. When in doubt, rent a dedicated siding nailer from any home improvement center for $40 to $60 per day. It is the cheapest insurance for a project that will define your home’s exterior for decades.

Anna has over six years of experience in the home services and journalism industries and serves as the Content Manager at MyHomePros.com, specializing in making complex home improvement topics like HVAC, roofing, and plumbing accessible to all. With a bachelor’s degree in journalism from Auburn University, she excels in crafting localized, comprehensive guides that cater to homeowners’ unique needs. Living on both coasts of the United States has equipped her with a distinctive perspective, fueling her passion for turning any house into a cherished home through informed, personalized decision-making.
Connect with top-rated local contractors who can help you with siding, roofing, HVAC, windows, and more. Get free quotes from verified professionals in your area today.