Skipping underlayment is one of the fastest ways to shorten the life of a new floor. That thin layer between your subfloor and finished flooring controls moisture, absorbs sound, smooths out imperfections, and adds cushioning underfoot.
Yet many homeowners treat it as optional, or grab whatever is cheapest at the home center without considering what their floor type actually requires.
The right underlayment depends on your flooring material, your subfloor type (concrete vs. plywood), and the room’s exposure to moisture. Getting the match wrong can void your flooring warranty, create hollow spots, or trap moisture that leads to mold.
This guide covers when underlayment is necessary, which materials work best for each flooring type, what it costs, and how to install it yourself.
What Is Flooring Underlayment?
Underlayment is a thin layer between the subfloor and finished flooring that provides cushioning, moisture control, and sound absorption.
Underlayment serves as the intermediary between your structural subfloor and the flooring surface you walk on. The subfloor is the structural layer, typically plywood, oriented strand board (OSB), or concrete, that sits on top of your floor joists.
Underlayment goes directly on top of that surface before the finished flooring is laid down.
It performs four primary functions:
- Surface leveling. Bridges minor subfloor imperfections like small dips, bumps, and gaps between plywood sheets to create a smooth, even surface for flooring.
- Moisture protection. Prevents water vapor from migrating up through concrete or wood subfloors and damaging the finished floor above.
- Sound absorption. Reduces impact noise from footsteps, which is especially important in multi-story homes, condominiums, and apartments.
- Cushioning. Adds a layer of padding that makes hard-surface floors more comfortable to stand and walk on.
Underlayment should not be confused with a vapor barrier, though the two are sometimes combined into one product. A vapor barrier is specifically designed to block moisture transmission.
Some underlayment products include a built-in vapor barrier (often a polyethylene film layer), while others provide only cushioning and sound reduction. In rooms where both moisture protection and sound absorption are needed, such as a basement or a second-floor bedroom, you may need an underlayment with an integrated vapor barrier or two separate layers working together.
Do You Always Need Underlayment?
Most floating floors require underlayment, but some products include pre-attached padding, and glue-down installations typically skip it.
The answer depends on three factors: your flooring type, your installation method, and your subfloor material.
Flooring Types That Require Underlayment
Three of the most common flooring materials depend on underlayment for proper performance. Skipping it with any of these can lead to noise, joint failure, or premature wear.
Laminate Flooring
Laminate almost always needs a separate underlayment unless the planks come with padding pre-attached. Laminate is a floating floor, meaning it is not fastened to the subfloor.
Without underlayment, the planks will feel hollow underfoot, produce excessive noise, and wear out prematurely at the locking joints. If you are weighing the full scope of a laminate project, a laminate flooring cost guide can help you budget for underlayment as part of the total installation expense.
Engineered Hardwood (Floating Installation)
Engineered hardwood also benefits significantly from underlayment. The thin wear layer on engineered planks is vulnerable to stress from an uneven subfloor, and underlayment helps distribute weight evenly across the locking system.
Luxury Vinyl Plank (LVP) and Luxury Vinyl Tile (LVT)
LVP and LVT may or may not need underlayment depending on the product. Many LVP products now ship with padding pre-attached to the bottom of each plank.
Adding a second layer of underlayment on top of what is already built in can actually cause problems, making the floor too soft and stressing the click-lock joints. Always check your manufacturer’s specifications first.
For a deeper look at LVP costs and what is included, see this LVP flooring cost guide.
When Underlayment Is Optional or Unnecessary
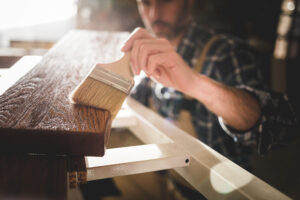
Nail-down solid hardwood traditionally uses felt paper or rosin paper rather than foam underlayment. These thin papers reduce squeaks and provide light moisture resistance.
The National Wood Flooring Association (NWFA) recommends asphalt-laminated paper or asphalt-saturated kraft paper for solid hardwood over wood subfloors, noting that plastic sheeting can trap moisture and prevent the floor from breathing.
Glue-down flooring of any type typically does not use traditional underlayment because the adhesive bonds the flooring directly to the subfloor. Adding a cushioned layer underneath would compromise the bond.
Tile and stone floors use cement backer board or mortar beds rather than traditional underlayment. These rigid substrates provide the flat, stable surface that tile requires.
Carpet uses its own dedicated padding (carpet pad), which serves a similar purpose but is thicker and softer than hard-surface underlayment.
Actual costs depend on your location, project scope, and materials. The best way to know what you'll pay is to get quotes from local contractors.
Get Your Free Estimate →Subfloor Type Matters
Concrete subfloors require a moisture barrier in nearly every situation. Concrete is porous and wicks moisture upward through capillary action, even in above-grade installations.
A vapor barrier underlayment or a separate polyethylene moisture barrier is essential to prevent warping, mold, and adhesive failure.
Plywood and OSB subfloors are less prone to moisture transmission but still benefit from underlayment for sound reduction and leveling. A vapor barrier is typically unnecessary on second or third floors unless the building has known moisture issues.
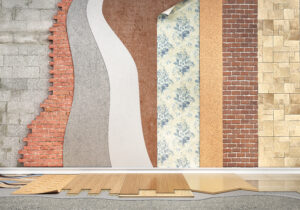
Types of Flooring Underlayment
Several underlayment materials are available, each with distinct strengths suited to different flooring types and room conditions.
The table below summarizes the most common underlayment types, their primary benefits, and ideal applications.
| Underlayment Type | Thickness Range | Best For | Key Benefits | Limitations |
|---|---|---|---|---|
| Foam (polyethylene) | 1/8″ to 1/4″ | Laminate, floating engineered wood | Affordable, lightweight, easy DIY install | Minimal sound and moisture protection |
| Cork | 1/8″ to 1/4″ | Hardwood, laminate, floating floors | Excellent sound absorption, natural antimicrobial properties | Higher cost, not moisture-resistant alone |
| Felt (recycled fiber) | 1/8″ to 3/16″ | Hardwood, engineered wood | Strong sound dampening, dense cushioning | Can absorb moisture if not treated |
| Rubber | 2mm to 5mm | Hardwood, tile, stone | Superior sound isolation, moisture resistant | More expensive, heavier to handle |
| Combination (foam + vapor barrier) | 1/8″ to 1/4″ | Laminate and LVP over concrete | Moisture protection and cushioning in one product | Moderate sound performance |
| Plywood | 1/4″ to 1/2″ | Vinyl sheet, tile prep | Creates smooth, rigid surface | No sound or moisture benefits |
"We matched with a great contractor the same day. The whole process was easy and completely free."
Foam Underlayment
Standard polyethylene foam is the most widely used underlayment for laminate and floating engineered hardwood. It is inexpensive, typically $0.25 to $0.50 per square foot for materials, and simple to install.
Foam comes in rolls that unroll across the subfloor, and rows are taped together at the seams. The trade-off is that basic foam provides minimal sound reduction and no moisture protection.
For ground-level or basement installations, choose a foam product with an integrated vapor barrier rather than basic foam alone.
Cork Underlayment
Cork is a premium option that excels at sound absorption. It naturally resists mold and mildew growth and provides a warmer feel underfoot compared to foam.
Cork underlayment typically costs $0.50 to $1.50 per square foot and is a strong choice for hardwood floors and upper-level installations where impact noise is a concern. If you are curious about cork as a finished surface rather than just an underlayment, explore whether cork flooring is the right choice for your home.
Felt Underlayment
Felt underlayment is made from recycled fibers compressed into a dense sheet. It provides better sound dampening than foam due to its higher density.
Felt is a solid mid-range option for hardwood and engineered wood installations, though it should only be used in dry environments unless it has been treated for moisture resistance.
Rubber Underlayment
Rubber delivers the best sound isolation of any underlayment material. A 2mm rubber sheet provides roughly the same noise reduction as 6mm of cork.
It is also naturally waterproof, making it suitable for basements and concrete subfloors. Rubber underlayment costs $1.00 to $3.00 per square foot and is most common in multi-family housing, condominiums, and commercial settings where IIC (Impact Insulation Class) and STC (Sound Transmission Class) ratings must meet building code or HOA requirements.
The U.S. Department of Housing and Urban Development has published guidelines on acceptable noise transmission levels in multi-family construction that influence these requirements.
What Are IIC and STC Ratings? Impact Insulation Class (IIC) measures how well a floor assembly reduces impact noise like footsteps. Sound Transmission Class (STC) measures resistance to airborne sound like voices and music. Most condominiums and HOAs require minimum scores of IIC 50 and STC 50. Premium rubber and cork underlayments can help reach or exceed these thresholds.
Combination Products
Many underlayment products now combine foam padding with a built-in polyethylene vapor barrier. These “2-in-1” or “3-in-1” products simplify installation by eliminating the need for a separate moisture barrier sheet.
They are the default recommendation for laminate and LVP flooring installed over concrete subfloors.
How Do You Choose the Right Underlayment for Your Floor Type?
Match your underlayment to the flooring material, installation method, and subfloor type, then verify manufacturer warranty requirements.
Choosing the wrong underlayment can void your flooring warranty. This is not a theoretical risk.
Many laminate and LVP manufacturers specify exact underlayment thickness limits (usually 3mm maximum) and may prohibit certain materials entirely. Always check your flooring manufacturer’s installation guide before selecting an underlayment.
Use this decision framework to narrow your options:
| Your Situation | Recommended Underlayment |
|---|---|
| Laminate over plywood subfloor | Standard foam (1/8″) |
| Laminate over concrete | Foam with integrated vapor barrier |
| Floating engineered hardwood, upper floor | Cork or felt for sound absorption |
| LVP with attached pad, over concrete | Vapor barrier film only (no additional padding) |
| LVP without attached pad, over plywood | Thin foam or manufacturer-specified product |
| Nail-down solid hardwood over plywood | Felt paper or asphalt-saturated kraft paper |
| Basement installation, any floating floor | Rubber or foam with vapor barrier |
| Condo or apartment with IIC/STC requirements | Rubber or premium cork (check required ratings) |
When deciding between underlayment options, also consider how each type of flooring interacts with different substrates. The right pairing affects not only comfort but also long-term durability.
Pro Tip: If your LVP or laminate flooring already has padding attached, do not add a separate cushioned underlayment on top. Doubling up creates a surface that is too soft, which puts excessive stress on the click-lock joints and can cause planks to separate over time. If your subfloor is concrete, lay down a thin moisture barrier film only.
Why Hire a Licensed Professional
- Licensed & insured — protects you from liability
- Warranty coverage — manufacturers require pro installation
- Code compliance — avoids permit issues
- Faster completion — pros finish in days, not weeks
How Much Does Underlayment Cost?
Underlayment materials typically cost $0.25 to $3.00 per square foot, with professional installation adding $0.50 to $2.00 per square foot in labor.
For most homeowners installing laminate or LVP in a standard room, underlayment adds a relatively small amount to the overall flooring installation cost. The material expense depends on the type you choose and the square footage of the project.
| Underlayment Type | Material Cost (per sq. ft.) | Installed Cost (per sq. ft.) |
|---|---|---|
| Basic foam | $0.25 to $0.50 | $0.75 to $1.50 |
| Foam with vapor barrier | $0.30 to $0.75 | $0.80 to $1.75 |
| Cork | $0.50 to $1.50 | $1.00 to $2.50 |
| Felt | $0.40 to $1.00 | $0.90 to $2.00 |
| Rubber (acoustic-grade) | $1.00 to $3.00 | $1.50 to $5.00 |
| Plywood (1/4″) | $0.50 to $1.00 | $1.50 to $3.00 |
For a 500-square-foot project, basic foam underlayment runs roughly $125 to $250 for materials. Premium rubber underlayment for the same area could reach $500 to $1,500.
Most flooring contractors include standard underlayment installation in their labor quote, but specialty products may be priced as a separate line item. When gathering estimates, ask whether underlayment is bundled into the install price or billed separately so you know what to expect during flooring installation.
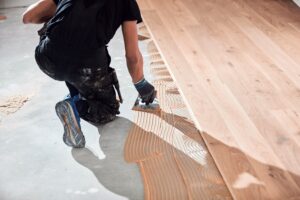
How to Install Flooring Underlayment
Most roll-out underlayment installs in under an hour for a standard room, requiring only a utility knife, tape, and a clean subfloor.
Installing underlayment is one of the more accessible DIY tasks in a flooring project, as long as you follow a few critical rules. The process below applies to foam, cork, and felt roll products used under floating floors.
Tools and Materials
You will need a utility knife or sharp scissors, underlayment tape (not standard packing tape), a tape measure, and the underlayment rolls themselves. For concrete subfloors, have a moisture meter on hand to test the slab before laying anything down.
The U.S. Environmental Protection Agency recommends maintaining indoor relative humidity below 60% to prevent mold growth, and this principle applies directly to subfloor conditions before installation.
DIY vs. Professional: At a Glance
Step-by-Step Installation
Step 1: Prepare the Subfloor
Remove all existing flooring, padding, staples, and debris. Sweep or vacuum thoroughly.
Inspect for protruding nails, cracks, and uneven spots. Hammer down any raised fasteners and fill gaps wider than 1/8″ with floor patching compound.
The subfloor must be flat, dry, and structurally sound before proceeding.
Step 2: Test for Moisture
On concrete subfloors, use a moisture meter to verify that levels fall within acceptable limits. The NWFA recommends moisture content no higher than 75% relative humidity using the in-situ probe method, or 3 lbs/1,000 sq. ft./24 hours using the calcium chloride test.
If moisture levels are too high, address the source before installing any flooring. Understanding basement moisture problems and their causes can help identify whether deeper remediation is needed.
Step 3: Roll Out the First Row
Start at one wall and unroll the underlayment across the room in the same direction you plan to lay the flooring planks. Let the material run up the wall by 2 to 3 inches.
You will trim the excess after the flooring is installed and before baseboards go on.
Step 4: Butt Rows Together, Do Not Overlap
When you start the second row, butt its edge directly against the first row with no overlap and no gap. Overlapping creates a raised ridge that will telegraph through the finished floor and can stress plank joints.
Tape the seams together with underlayment tape to prevent shifting during installation.
Step 5: Work Section by Section
Do not unroll the entire room’s worth of underlayment at once. Lay one or two rows, install the flooring on top, then roll out the next section.
This keeps the underlayment clean, prevents it from shifting, and gives you a clear working area.
Step 6: Cut Around Obstacles
Use a utility knife to cut around door frames, pipes, and vents. Leave a small gap (about 1/4″) around fixed objects to allow for expansion.
The underlayment does not need to fit tightly against walls or obstacles since baseboards and trim will cover the edges.
Important: If your underlayment has a built-in vapor barrier (the shiny film side), always place the vapor barrier side facing down toward the subfloor. Overlap the vapor barrier tabs by the amount specified by the manufacturer, typically 3 to 6 inches, and tape them to create a continuous moisture seal.
Common Underlayment Mistakes to Avoid
Using the wrong underlayment type, doubling up padding, or skipping moisture testing are the most frequent causes of premature flooring failure.
Even experienced DIYers make underlayment errors that show up weeks or months after installation. These are the mistakes that cause the most damage.
Spring and summer are the busiest seasons for home improvement projects — top-rated contractors book up fast. Lock in your estimate now before demand peaks.
Check Availability in Your Area →Using Foam Under Nail-Down Hardwood
Foam is designed for floating floors. Nailing through foam compresses it unevenly, creating soft spots and squeaks.
Solid hardwood installations should use felt paper, rosin paper, or manufacturer-specified products.
Skipping the Moisture Test on Concrete
Concrete slabs transmit moisture vapor even when they look and feel dry. Installing any flooring over concrete without testing and addressing moisture levels risks warping, buckling, mold, and adhesive failure.
This single oversight causes more flooring warranty claims than almost any other installation error.
Overlapping Seams
Overlapping underlayment at the seams creates a raised line that causes visible bumps and uneven wear patterns on the finished floor. Rows should always be butted together and taped flat.
Ready to Move Forward?
Tell us about your project and get matched with up to 3 pre-screened contractors. Compare quotes, check reviews, and hire with confidence.
Adding Extra Underlayment for “Softer” Floors
Thicker is not always better. Excessive underlayment thickness, particularly anything beyond 3mm under laminate or LVP, destabilizes the locking system.
The floor may feel spongy at first and eventually develop gaps between planks.
Ignoring Manufacturer Specifications
Flooring warranties frequently exclude damage caused by using an unapproved underlayment type or thickness. Read the installation guide before purchasing underlayment, not after.
Understanding the broader flooring installation mistakes to avoid can save you from costly callbacks.
Failing to Tape Seams
Untaped seams shift during installation and create gaps that compromise moisture protection. Every seam should be sealed with underlayment-specific tape to maintain a continuous barrier.
Getting Your Underlayment Right the First Time
The right underlayment protects your flooring investment by preventing moisture damage, reducing noise, and extending the life of your floors.
When choosing flooring and underlayment together, it helps to start with a clear understanding of which flooring works best in each room so you can match the underlayment to both the material and the environment. Every decision in this process, from material type to vapor barrier placement, affects how well your floor performs over the next 10 to 20 years.
Ready to start your flooring project? Choosing the right underlayment is one of the most important early decisions in any flooring installation. MyHomePros connects you with experienced local flooring contractors who can assess your subfloor, recommend the correct underlayment, and handle the full installation.

Anna has over six years of experience in the home services and journalism industries and serves as the Content Manager at MyHomePros.com, specializing in making complex home improvement topics like HVAC, roofing, and plumbing accessible to all. With a bachelor’s degree in journalism from Auburn University, she excels in crafting localized, comprehensive guides that cater to homeowners’ unique needs. Living on both coasts of the United States has equipped her with a distinctive perspective, fueling her passion for turning any house into a cherished home through informed, personalized decision-making.
Connect with top-rated local contractors who can help you with siding, roofing, HVAC, windows, and more. Get free quotes from verified professionals in your area today.